
Jim Grainge
The Base-24 Budget
How to Master Biweekly Pay and Build Wealth on Autopilot
Let’s be completely honest: if you get paid every two weeks, standard monthly budgeting advice feels like trying to shove a square peg into a round hole. You open a spreadsheet or budgeting app, and it asks you to list your monthly income against your bills. But when your rent is due on the 1st and your direct deposit lands on the 28th, you end up feeling completely broke before the first week of the month even wraps up.
Here is the simple, stress-free fix: The Base-24 Budget Rule. Instead of dividing your annual earnings by 12, you run your everyday household life on exactly 24 paychecks a year (two per month). You completely ignore the two “extra” paychecks when mapping out your day-to-day bills. By setting up this framework, you eliminate the mid-month cash crunch, balance your checkbook on autopilot, and turn those two bonus paychecks into massive wealth accelerators.
The Calendar Glitch Costing You Money
If you constantly feel like your money vanishes right after payday, you aren’t bad at math—you are just dealing with a weird calendar glitch. A normal calendar year has 52 weeks. If you receive biweekly direct deposits as an employee with a Form W-2 (Wage and Tax Statement), you receive 26 paychecks a year. But our calendar only has 12 months. That means you average 2.16 paychecks per month.
Most budgeting advice tells you to take your yearly take-home pay and divide it by 12. That sounds logical, but in real life, it sets a trap. Say you bring home $2,500 every two weeks. On paper, your average monthly income is $5,416.67 ($65,000 divided by 12). If you budget to spend $5,416 each month, your budget will break in 10 out of the 12 months. Why? Because in those 10 months, only two paychecks ($5,000) actually hit your checking account. Spending based on that “monthly average” quietly creates a $416.67 deficit every standard month, tempting you to lean on credit cards with a punishing Annual Percentage Rate (APR) just to stay afloat.
ℹ️ The 26 vs. 24 Math in Plain English:
Twenty-four paychecks cover exactly 48 weeks of living expenses. That leaves 4 extra weeks floating around throughout the year, which form your two annual “3-paycheck months.” The Base-24 Rule tells you to ignore those 4 extra weeks in your day-to-day spending so you never get caught short when regular bills come due.
Next Step: Grab your last pay stub. Find your net take-home pay (the amount actually hitting your bank after taxes and deductions) and multiply it by 2. That number is your official monthly spending ceiling.
Building Your 2-Paycheck Monthly Blueprint
Under the Base-24 framework, every recurring bill you have—housing, electric, groceries, gas, subscriptions, and debt minimums—must fit comfortably inside two paychecks. Instead of juggling a 30-day calendar, you organize your life around two 14-day cash flow blocks: Paycheck A and Paycheck B.
The goal is balance. You never want Paycheck A to get crushed by giant bills while Paycheck B feels like a spending spree. You divide and conquer:
What happens if your mandatory bills and basic groceries add up to more than two paychecks? That is a clear sign that you don’t have a timing issue—you have an overhead issue. It means your fixed expenses are too high for your baseline income, and you need to look at trimming recurring contracts or temporarily using a bare-bones budget until your margins open up.
Next Step: Open your banking app and sort your fixed bills into two neat piles: bills paid out of Paycheck A, and bills paid out of Paycheck B.
The Half-Payment Hack (Killing the Rent Crunch)
The biggest stress point for biweekly earners is almost always the rent or mortgage payment. When a $1,800 housing payment hits on the 1st of the month, it takes a massive bite out of a single paycheck. You are left trying to survive on whatever scraps remain for the next two weeks.
The fix is the Half-Payment Hack:
- Take your total monthly housing cost (and any other massive bill, like a hefty car payment or childcare).
- Cut that number cleanly in half.
- Every single time you get paid, immediately move that half-payment out of your main spending account and into a secondary checking account set aside strictly for bills.
- When the 1st of the month rolls around, the full payment is already sitting there waiting. Your primary checking account never suffers a shock.
Having two checking accounts makes this foolproof. Account 1 is your Everyday Spending Account for fuel, groceries, and dining out. Account 2 is your Bills Account, where auto-pay handles your housing, utilities, and loans. When you separate your bill cash from your spending cash, you can’t accidentally spend your rent money at Target on a Saturday afternoon.
💡 Advice & Pro-Tip: The Automated Principal Hack
If you own a home, ask your lender if they offer true biweekly mortgage payments. Paying half your monthly mortgage payment every two weeks results in 26 half-payments a year. That equals 13 full payments instead of 12! That single extra payment goes straight toward your loan principal, cutting years off a 30-year mortgage without you having to sacrifice a penny of your monthly spending lifestyle.
Next Step: Open a secondary checking account labeled “Bills Buffer” and schedule an automatic transfer to send half of your next rent payment there on your very next payday.
What to Do With Paychecks 25 and 26 (The Wealth Accelerator)
Here is where the magic happens. Because your 24 base paychecks already cover 100% of your living overhead throughout the year, every dollar of Paychecks 25 and 26 is pure surplus. If you take home $2,500 every two weeks, you have $5,000 in uncommitted cash landing in your lap across the year.
To find your two “3-paycheck months,” open a calendar and look for months that have five Fridays (or five Wednesdays, depending on your pay cycle). When your payday lands on the 1st, 2nd, or 3rd of the month, that month will have three paydays. For example, if you get paid on Friday, January 2nd, your three-paycheck months will be January and July. If your first pay lands on January 9th, your bonus months will usually fall in May and October.
The trap is treating this money like an unexpected shopping windfall. When you don’t have a plan for it, that money disappears into takeout, gadgets, and impulse buying. Instead, run those paychecks through this 4-tier priority list:
- Tier 1: Emergency Buffer: If your savings are thin, drop the check into a High-Yield Savings Account (HYSA) backed by the Federal Deposit Insurance Corporation (FDIC). Earning a strong yield on liquid cash gives you instant peace of mind when life throws a curveball.
- Tier 2: High-Interest Debt Sprint: Throwing an extra $2,000 or $2,500 at credit card balances knocks down your principal fast and saves you hundreds of dollars in compounding interest charges.
- Tier 3: Annual Sinking Funds: Stash the money for big, predictable annual bills that always seem to sneak up on you—like car insurance premiums, annual Amazon Prime renewals, or holiday shopping.
- Tier 4: The 10% Celebration: We want this to be sustainable, not miserable! Keep 10% of that third check (say, $250) for a guilt-free dinner, a weekend road trip, or that pair of shoes you’ve been eyeing. Send the remaining 90% straight to your financial goals.
⚠️ Costly Mistake: The “Phantom Check” Trap
Never sign an apartment lease, buy a car, or commit to a monthly subscription based on having three paychecks. Remember, that third check only shows up twice a year. Relying on it for recurring monthly contracts guarantees a brutal cash crunch during the other ten months.
Next Step: Check your calendar right now, circle your two 3-paycheck months for this year, and pick which goal from Tier 1, 2, or 3 will get that money before it arrives.
The Ultimate Goal: Getting “One Paycheck Ahead”
The single best move you can make with your very first 3-paycheck month is to build a permanent checking buffer. Instead of sending that surplus check to debt or savings, leave it sitting right in your primary checking account.
This single move breaks the paycheck-to-paycheck cycle for good. It creates a rolling cushion equal to an entire paycheck. From that day on, you are always spending money you earned two weeks ago. Bill due dates stop mattering. You never have to worry about whether an electric bill or credit card payment clears on a Tuesday before payday Friday, because your account always has a built-in safety net.
🎉 The Peace-of-Mind Win:
When you live one paycheck ahead, grocery shopping and paying utility bills become completely stress-free. You stop holding your breath at checkout counters and stop checking your banking app ten times a day. Your cash flow simply runs on rails.
Next Step: Look back at your checking account over the last three months to find your lowest balance. Decide right now to use your upcoming surplus paycheck to lock in your permanent one-paycheck cushion.
📌 Your Base-24 Game Plan
1. Base-24 Rule: Budget your lifestyle strictly around two paychecks a month (24 total), ignoring the extra two checks for regular bills.
2. Half-Payment Hack: Cut rent or mortgage payments in half and move 50% each payday into a dedicated bills account.
3. Find Your Magic Months: Circle your two 3-paycheck months on the calendar today.
4. Live One Check Ahead: Use your first surplus paycheck to create a permanent buffer in checking so bill timing never stresses you out again.
TalkBudget provides general educational content and is not a registered financial advisor or CPA. Please consult a qualified professional before making major financial decisions.
The Biweekly Pay Trap
The biweekly pay trap and how to benefit from it.
(This page is an explainer for our article The Biweekly Paycheck Budget)
Since biweekly paychecks land exactly every 14 days, your paydays continuously drift across calendar dates.
Here we show in detail what that can mean for your income and which strategy to use for each month.
Click here to explore the Base-24 strategy further.
💡 How the “Cash Accelerator” Months Work:
In 10 out of 12 months (the soft blue rows), your living expenses are fully absorbed by exactly two paychecks. In May and October (the soft green rows), your third paycheck has zero bills attached to it. Rather than letting it disappear into lifestyle inflation, transfer that entire third check into a High-Yield Savings Account (HYSA) or send it directly to your highest-interest credit card balance.
📌 Your Biweekly Cash Flow Rule of Thumb
• 24 Paychecks: Run your everyday household life, rent, groceries, and debt minimums.
• 2 Paychecks: Act as wealth accelerators, generating 100% pure financial progress twice per year.
What Is Biweekly Grocery Envelope Pacing?
Biweekly grocery envelope pacing is dividing your monthly grocery allowance into strict, 14-day spending caps that reset on payday Friday, rather than attempting to manage food costs as a single 30-day lump sum. By syncing your grocery dollars directly with your biweekly pay schedule, you only have to plan for two weeks of meals and two supermarket runs at a time.
Groceries represent the single most volatile variable expense in an American household. Unlike rent or car loans, grocery costs fluctuate weekly based on family cravings, sales promotions, and spontaneous supermarket additions. When you pace your grocery envelope every 14 days, you remove the guesswork and eliminate the mid-month cash crunch that derails traditional monthly budgets.
The Problem It Solves: The “Feast or Famine” Trap
Most budgeting guides tell you to calculate a monthly food budget—such as $800—and track it across the calendar month. For biweekly workers, this approach almost always backfires into a predictable cycle:
- Days 1 to 10 (The Feast): Armed with a full month’s grocery allocation in checking, shoppers visit wholesale clubs, buy premium brand-name groceries, and fill their carts without checking prices.
- Days 11 to 20 (The Squeeze): An account check reveals that $550 of the $800 budget has already been spent, yet more than half of the month remains.
- Days 21 to 30 (The Famine): With little cash left, families face empty pantries. To get through the final stretch before the next calendar month, they often reach for a credit card, accumulating high-interest balances that undermine their financial progress.
Biweekly pacing eliminates this dynamic. If your household allocates $800 per month for groceries under the Base-24 budgeting model, you do not manage $800 at once. You assign exactly $400 to Paycheck A and $400 to Paycheck B. Each $400 deposit must last only 14 days.
How to Execute Biweekly Pacing: Cash vs. Digital
You can execute grocery pacing using physical paper envelopes or digital checking tools, depending on how much tactile friction you need to keep your spending on track:
- The Physical Cash Envelope Method: On payday morning, withdraw your biweekly grocery allocation in paper bills. Place the money into an envelope labeled “Groceries.” Take the envelope with you to the grocery store and leave your primary checking debit card in your glove box or at home. When the physical bills in the envelope are gone, your food spending pauses until your next paycheck arrives 14 days later.
- The Dedicated Digital Sub-Account: If you prefer digital transactions, set up a secondary checking account linked to a separate debit card used exclusively for groceries. On payday, automate a transfer of your 14-day allocation into this account. Once that balance reaches $0, the card declines, creating an effective digital spending barrier without risking your bill-paying funds.
ℹ️ Why 14-Day Horizons Work Better Than 30-Day Horizons:
Human brains struggle to forecast consumable resources over 30 days. Pacing your grocery spending in 14-day intervals matches your natural shopping cadence: one major weekend grocery run (e.g., $250 for base proteins and pantry staples) and one mid-cycle refresh run (e.g., $150 for produce, dairy, and bread).
💡 Advice & Pro-Tip: The Day-10 Pantry Challenge
On Day 10 of every 14-day cycle, conduct a quick inventory of your freezer and pantry before making another grocery run. Building two simple dinners around dry rice, canned black beans, pasta, and frozen vegetables can leave $40 to $70 in your grocery envelope by Day 14. You can roll that surplus into your emergency fund or treat yourself to a celebratory takeout dinner on payday evening.
📌 Actionable Next Step
Review your bank statement to calculate your total monthly grocery outlays, then divide that figure by two. When your next direct deposit arrives on Friday, move that half-amount into an envelope or dedicated sub-account and challenge your household to live entirely within that 14-day limit until the next paycheck lands.
TalkBudget provides general educational content and is not a registered financial advisor or CPA (Certified Public Accountant). Please consult a qualified professional before making major financial decisions.
The Biweekly Paycheck Budget
The Biweekly Trap: Why Your Budget Feels Broken
If you have ever stared at your checking account on the second day of the month wondering where your entire paycheck went, you are not bad with money—you are simply caught in the biweekly trap. According to the Bureau of Labor Statistics (BLS), over 43% of US private-sector businesses pay their employees on a biweekly schedule, making it the most common pay cadence in America. Yet nearly every budgeting app, personal finance book, and tracking spreadsheet is configured for a traditional 12-month calendar.
A standard calendar year has 52 weeks. When you divide 52 by two, you get 26 paychecks per year. But the calendar only has 12 months. That means you receive 2.16 paychecks per month. Because that 0.16 extra payment does not hit your checking account on a neat, predictable monthly schedule, biweekly earners constantly face two recurring headaches:
- The “First-of-the-Month” Wipeout: Rent or mortgage payments are typically due on the 1st. If your direct deposit hits on the 28th, housing costs can instantly consume 70% to 100% of that single paycheck. You are left stretching $100 across groceries, gas, and utilities for the next 13 days until Paycheck 2 arrives.
- Drifting Paydays: Because biweekly pay lands exactly every 14 days, your paydays continuously drift across calendar dates. A paycheck that lands on Friday the 3rd this month will land on the 17th next month and the 31st after that. Static monthly budgets fail because your due dates remain frozen on the calendar while your paydays move.
Click to see more on The Biweekly Pay Trap and how to use it for your benefit.
ℹ️ The 26 vs. 12 Reality Check:
If your net take-home pay on your Form W-2 (Wage and Tax Statement) is $2,200 every two weeks, your true average monthly income is $4,766.67 ($57,200 divided by 12). However, spending based on $4,766 every month will cause cash shortfalls in standard two-paycheck months. Budgeting strictly for two paychecks ($4,400) keeps cash flow predictable and stable.
Next Step: Pull up your most recent pay stub. Write down your exact net take-home pay for an ordinary 80-hour pay period, excluding any one-off reimbursements or seasonal overtime.
Step 1: The “Base-24” Framework (Live on 2 Paychecks a Month)
The foundation of biweekly budgeting is what we call the Base-24 Framework. Instead of multiplying your paycheck by 26 and dividing by 12, pretend those two “extra” paychecks do not exist. Your baseline monthly living expenses must fit entirely within two paychecks per month (24 paychecks a year).
If you bring home $2,200 every two weeks, your operational monthly budget is exactly $4,400. All mandatory living expenses—rent, utilities, groceries, debt minimums, subscriptions, and discretionary spending—are assigned across Paycheck A and Paycheck B. If your fixed overhead exceeds what two paychecks can cover, you do not have a timing problem; you have an expense problem that requires a bare bones budget audit to trim recurring bills.
Next Step: List your mandatory monthly outlays and verify that your total non-negotiable living costs fit comfortably inside two paychecks. If they do not, look at reducing flexible expenses before assigning your dollars.
Step 2: The Half-Payment Method for Rent and Loans
The single greatest point of friction for biweekly workers is the housing payment. When a $1,700 rent or mortgage bill lands entirely on Paycheck A, the rest of the two-week cycle turns into a stressful exercise in rationing groceries and postponing gas fill-ups.
The Half-Payment Method neutralizes this problem by smoothing big payments across every paycheck:
- Take your largest fixed recurring payments (housing, auto loans, daycare).
- Divide that monthly total by two.
- The moment Paycheck 1 hits your account, immediately transfer that 50% share into a separate checking account designated specifically for recurring bills.
- When Paycheck 2 arrives two weeks later, transfer the second 50% share into that same account.
- When the 1st of the month arrives, the entire payment is already sitting waiting, fully funded without having decimated either individual paycheck.
To make this effortless, operate two checking accounts at your bank. Account 1 is your Operating Checking, where direct deposits land and everyday variable expenses (groceries, dining out, gas) are paid using your debit card. Account 2 is your Bills Checking, where fixed payments are parked and auto-debited. Keeping your bill money physically separate prevents you from accidentally spending next week’s mortgage payment on weekend entertainment.
💡 Advice & Pro-Tip: The “Mortgage Half-Payment” Advantage
Check whether your mortgage servicer accepts automated biweekly half-payments. Paying half your mortgage every two weeks results in 26 half-payments—equal to 13 full monthly payments per year. That extra payment applies directly to your loan principal, cutting years off your amortization schedule and saving thousands in interest without any noticeable lifestyle pinch.
Next Step: Open your banking app and set up a secondary checking account labeled “Bills Buffer.” Calculate half of your rent or mortgage, and schedule an automatic transfer to move that exact amount on your next payday morning as part of your 3-step payday routine.
Step 3: How to Locate and Win Your “3-Paycheck Months”
Because you are structuring your entire baseline budget on 24 paychecks, the two months where you receive three paychecks offer an incredible opportunity. In those two months, your regular two paychecks already cover 100% of your living expenses. That third paycheck is pure surplus.
To find your 3-paycheck months, look at a calendar and identify any month where your payday Friday falls on the 1st, 2nd, or 3rd:
- If your first paycheck of the year is paid on Friday, January 2nd, your 3-paycheck months will land in January and July.
- If your first paycheck lands on Friday, January 9th, your 3-paycheck months will typically land in May and October.
The biggest pitfall biweekly workers encounter is viewing this third check as unexpected bonus cash. When you don’t assign it a clear job in advance, it quietly vanishes into dining out, impulse online shopping, and miscellaneous lifestyle inflation. Instead, use a strict priority waterfall to deploy that capital:
- Build a Liquid Emergency Reserve: If you don’t have at least one month of bare-bones expenses saved, route this entire check into a High-Yield Savings Account (HYSA) to complete your journey of starting an emergency fund from scratch. Look for an account insured by the Federal Deposit Insurance Corporation (FDIC) earning a competitive Annual Percentage Yield (APY).
- Crush High-Interest Revolving Debt: If your emergency cushion is in place, throw the entire paycheck at credit cards or high-interest personal loans. A single $2,000 extra payment can knock months off your payoff timeline and save hundreds in compounding finance charges.
- Fund Annual Sinking Funds: Use the surplus to prepay non-monthly expenses that routinely catch you off guard, such as semi-annual auto insurance premiums, property taxes, or holiday gifts, using a structured sinking fund strategy.
- Permit a 10% Guilt-Free Reward: To prevent budget burnout and help you continue sticking to a budget, keep 10% of that third check (e.g., $200 out of a $2,000 check) for a celebratory dinner, weekend getaway, or hobby purchase. Deploy the remaining 90% toward financial progress.
⚠️ Costly Mistake: The “Phantom Paycheck” Trap
Never commit your third paycheck to ongoing monthly contracts, such as an upgraded apartment lease, an expensive car payment, or recurring subscriptions. Because that third check only arrives twice a year, relying on it to cover monthly overhead creates a severe cash shortfall across the remaining ten months.
Next Step: Open your smartphone calendar right now. Find the two months this year containing three paydays, create an event titled “3-Paycheck Bonus,” and decide in writing today whether that money goes to savings, debt, or sinking funds.
The Ultimate Goal: The “One Paycheck Ahead” Buffer
The final milestone of biweekly cash flow management is breaking the timing dependence entirely. In the beginning, you coordinate bill due dates around whether Paycheck A or Paycheck B hit first. While effective, you are still reacting to calendar dates.
The permanent cure is living one paycheck ahead. When your first 3-paycheck month arrives, resist the urge to spend it or send all of it to long-term investments. Instead, leave that entire third check sitting permanently inside your primary checking account as a rolling operating buffer.
🎉 The Peace-of-Mind Milestone:
Once you have a full paycheck buffer permanently parked in your checking account, bill due dates stop mattering. You no longer have to check whether an electric bill or credit card payment debits on a Wednesday before payday Friday. You are always spending money you earned two weeks ago, eliminating checking account anxiety forever.
Pairing this buffer with an overarching framework like the 50/30/20 budget or zero-based budgeting gives you complete control over your cash flow. You stop stressing over when payroll runs and start focusing on what your money can accomplish for you.
Next Step: Review your checking account balance over the last three months. Determine the lowest balance you reached, and set a target to build a buffer equal to one full biweekly paycheck using your next surplus check.
📌 Biweekly Budget Action Checklist
1. Base-24 Rule: Calculate your monthly budget using only 24 paychecks (2 per month), ignoring the extra two payments for everyday expenses.
2. Half-Payment Method: Divide rent, mortgage, and large loan payments in half and transfer 50% from each biweekly paycheck into a separate bills account.
3. Find Your 3-Paycheck Months: Circle the two months this year containing three paydays and assign that surplus money before it arrives.
4. Build the Buffer: Use your first surplus paycheck to establish a one-paycheck cushion in checking so bill timing never stresses you out again.
TalkBudget provides general educational content and is not a registered financial advisor or CPA. Please consult a qualified professional before making major financial decisions.
How to Budget on an Irregular Income
A Simple Guide for 1099 Earners and Gig Workers
Budgeting on an irregular income is not a math problem—it is a cash flow timing problem. Traditional budgets assume your money arrives like clockwork every two weeks with taxes already withheld, but freelance gigs, client contracts, and delivery platforms do not follow a predictable calendar.
The secret to mastering variable income is decoupling what you spend today from what you earned yesterday. By setting a baseline survival floor, quarantining taxes the second a payment clears, and paying yourself a fixed monthly “salary” from a separate holding account, you can eliminate the feast-or-famine stress and make erratic 1099 earnings feel as dependable as a traditional corporate paycheck.
Why Traditional Budgets Break for Freelancers and Gig Workers
Most budgeting advice is designed for W-2 (Wage and Tax Statement) employees who receive predictable net paychecks. If your take-home pay is always $2,200 on the 1st and the 15th, planning a static monthly spending plan is straightforward arithmetic.
If you work as an independent contractor receiving Form 1099-NEC (Nonemployee Compensation) or platform payouts reported on Form 1099-K (Payment Card and Third Party Network Transactions), your income swings based on seasonal demand, client approval cycles, and hours worked. More critically, companies do not withhold taxes from your pay. Receiving 100% of your gross earnings creates the dangerous illusion that you have more spendable cash than you actually do.
When a good month brings $6,500 and a slow month drops to $1,800, a rigid budget fails. You either overspend during the boom or lean on high-interest credit cards during the slump. To take control, you need an operational cash flow system built specifically for income volatility.
Next Step: Review your bank statements from the last four to six months. Do not worry about categorizing individual line items yet—simply note your highest-earning month and your lowest-earning month to determine your volatility spread.
Step 1: Calculate Your “Bare-Bones” Baseline Floor
Before allocating money toward lifestyle goals, vacations, or extra investments, you must pinpoint your exact survival number. This is the minimum amount of cash required each month to cover your non-negotiable living expenses: shelter, utilities, essential groceries, work transportation, and minimum debt payments.
We call this your Bare-Bones Budget. It strips away restaurant takeout, streaming subscriptions, and discretionary retail. Knowing this number gives you instant psychological relief: it represents the exact dollar benchmark your business or gig work must clear each month to keep you afloat without adding new debt.
Next Step: Add up your five non-negotiable categories using your actual receipts from last month. Write down your total baseline survival number where you can see it regularly.
Step 2: Build the 4-Account Cash Flow Waterfall
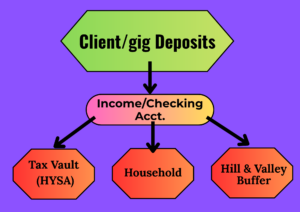
Illustration of the cash flow waterfall concept.
The single most destructive habit among 1099 earners is depositing gig payouts, client checks, tax money, and grocery cash into one single personal checking account. When all your money sits in one pool, you cannot tell what is safe to spend, what belongs to the government, and what is needed for next month’s rent.
To eliminate this confusion, set up an automated 4-account waterfall using free online checking and savings sub-accounts:
- 1. The Income Holding Tank (Business Checking): Every client invoice, direct deposit, and app payout lands here first. You never swipe a debit card or pay personal bills out of this account.
- 2. The Tax Vault (HYSA): A dedicated HYSA (High-Yield Savings Account) where tax reserves sit untouched until quarterly payment dates.
- 3. The Hill-and-Valley Buffer (HYSA): A cash reserve designed to stockpile excess earnings during high-income months and bridge shortfalls during lean months.
- 4. The Household Operating Account (Personal Checking): Your everyday personal account where you receive a predictable “paycheck” to cover family living expenses.
ℹ️ Why High-Yield Accounts Protect Your Reserves:
Keeping your Tax Vault and Hill-and-Valley Buffer in an HYSA ensures your idle cash earns full market interest while staying completely liquid. Verify that your chosen institution is backed by the FDIC (Federal Deposit Insurance Corporation) or NCUA (National Credit Union Administration) to ensure your deposits are insured up to legal limits.
Next Step: Log into your primary banking app and open two dedicated sub-savings accounts labeled “Tax Vault” and “Hill-and-Valley Buffer.”
Step 3: Quarantine Taxes on Day One
As an independent contractor, you are responsible for paying both the employer and employee portions of Social Security and Medicare taxes. This is the self-employment tax, which sits at a statutory rate of 15.3% on net self-employment earnings, alongside your ordinary federal and state income taxes.
The moment any payment lands in your Income Holding Tank, immediately transfer 25% to 30% straight into your Tax Vault. If an invoice clears for $1,200, move $300 to $360 into your Tax Vault before budgeting a single dollar for business software, personal bills, or entertainment. Treat that money as if it was never yours.
⚠️ Avoid the IRS Underpayment Penalty:
The IRS (Internal Revenue Service) requires most self-employed individuals expecting to owe $1,000 or more in annual taxes to make quarterly estimated payments using Form 1040-ES. Waiting to pay your entire tax bill on April 15 can trigger costly underpayment penalties and interest charges, even if you pay your total balance in full on tax day.
Set calendar reminders for the standard IRS quarterly estimated tax deadlines:
- April 15 (First quarter earnings: Jan 1 – Mar 31)
- June 15 (Second quarter earnings: Apr 1 – May 31)
- September 15 (Third quarter earnings: Jun 1 – Aug 31)
- January 15 (Fourth quarter earnings: Sep 1 – Dec 31)
Next Step: Calculate 30% of your most recent client payment or gig deposit, and transfer that exact amount into your Tax Vault today.
Step 4: Pay Yourself a Predictable “Salary” (The Owner’s Draw)
Once taxes are cordoned off in your Tax Vault, you can stabilize your household finances. Instead of transferring erratic lump sums into your personal checking account whenever you run low on cash, pay yourself a consistent biweekly or monthly “salary” (also known as an owner’s draw).
How to Set Your Salary Target
Base your salary on your bare-bones survival floor plus a modest cushion for day-to-day comfort. If your baseline floor is $2,600 and a typical lifestyle month costs $3,000, set your draw at $2,800 or $3,000. Schedule a recurring transfer from your Income Holding Tank to your Household Operating Account on the 1st and 15th of each month (e.g., $1,500 per transfer).
Managing a “Feast” Month ($5,200 Net After Taxes)
- Your income account receives $5,200 after taxes.
- You transfer your standard $3,000 salary to your Household Operating Account.
- The remaining $2,200 surplus does not get spent. It moves directly into your Hill-and-Valley Buffer.
Managing a “Famine” Month ($1,900 Net After Taxes)
- Your income account brings in only $1,900 after taxes.
- You still need your standard $3,000 salary to cover personal expenses without stress.
- Transfer the $1,900 from your holding account, then withdraw the remaining $1,100 directly from your Hill-and-Valley Buffer.
- Your household bills are paid on time, your credit score is protected, and your daily life remains completely stable.
🎉 The Freelance Gold Standard: Living on Last Month’s Income
When your Hill-and-Valley Buffer reaches one full month of operating expenses, you achieve the ultimate independent milestone: funding April’s life entirely with money earned and cleared in March. Invoicing delays and late client payments stop feeling like financial emergencies.
Next Step: Pick a fixed owner’s draw amount based on your baseline floor, and schedule your first fixed transfer for this coming Friday.
Connecting Your Cash Flow to Long-Term Wealth
When you transform variable gig revenue into a predictable personal salary, the rest of your financial life falls neatly into place. You can now implement proven wealth-building strategies without fear of cash shortages:
- Organize Personal Spending: Apply structured frameworks like The 50/30/20 Budget to your personal operating account, allocating 50% of your draw to needs, 30% to wants, and 20% to personal savings.
- Establish Sinking Funds: Set aside small monthly amounts for irregular business expenses (annual software renewals, quarterly insurance premiums, quarterly car maintenance) so they never compete with your personal salary.
- Build a True Emergency Reserve: Remember that your Hill-and-Valley Buffer is for income volatility, not unexpected personal crises. Review our guide on Starting an Emergency Fund from Scratch to build an independent 3-to-6 month personal safety net.
💡 Advice & Pro-Tip: Open Accounts at Separate Institutions
If you struggle with the temptation to spend money when you see it on your screen, hold your Tax Vault and Hill-and-Valley Buffer at a completely different online bank than your daily checking account. Removing tax money from your daily line of sight eliminates impulse transfers.
📌 Quick Takeaway: The 1099 Cash Flow Action Plan
1. Calculate your floor: Add up rent, utilities, food, transport, and debt minimums to find your baseline.
2. Separate your accounts: Run revenue through an Income Holding Tank, not your personal checking account.
3. Quarantine 25%–30% for taxes: Transfer tax money to your Tax Vault the day a deposit clears.
4. Pay yourself a salary: Transfer a fixed amount twice a month; let the Hill-and-Valley Buffer smooth out the peaks and valleys.
TalkBudget provides general educational content and is not a registered financial advisor or CPA (Certified Public Accountant). Please consult a qualified professional before making major financial decisions.
Sinking Funds 101: How to Budget for Big Expenses Without Draining Your Savings
Sinking Funds 101: How to Budget for Big Expenses Without Draining Your Savings
You work hard for months to build a $1,000 cash cushion in your savings account. Then, life happens: your semi-annual auto insurance premium arrives in the mail, your car needs a new set of tires, or December holiday shopping sneaks up on you. In a single afternoon, your hard-won savings balance drops right back down to zero.
This exhausting financial loop is known as the “yo-yo savings” trap, and it is one of the most common reasons everyday Americans give up on budgeting altogether. The problem is not your discipline or your ability to save. The real problem is that you are treating predictable, routine expenses like unexpected emergencies.
A sinking fund is a simple, stress-free strategy where you save a small amount of money each week, pay period, or month toward a specific, known upcoming expense. Instead of scrambling to produce $600 or $1,200 all at once, you break that total bill down into small, bite-sized contributions that fit naturally into your regular paycheck routine.
In this guide, you will learn how sinking funds work, how to separate them from your emergency fund, the top seven categories every household needs, and how to organize everything using our free embedded calculator and downloadable Google Sheets tracking template.
What is a Sinking Fund (And Why Do You Need One)?
The term “sinking fund” originally comes from corporate finance, where businesses set aside capital gradually over time to pay off a bond or future debt obligation. In personal finance, the concept is far simpler: you are “sinking” small amounts of cash into a dedicated savings bucket so that when a planned bill arrives, the money is already sitting there waiting to be spent.
Consider your car insurance. If your policy renewal costs $600 every six months, trying to pay that entire amount out of a single biweekly paycheck can make it nearly impossible to pay your rent or buy groceries. But when you divide that $600 by six months, you only need to set aside $100 per month—or just $50 per biweekly paycheck. When the renewal notice lands in your mailbox, paying it feels completely routine rather than panic-inducing.
Sinking Funds vs. Emergency Funds: Know the Difference
Many people lump all of their savings into a single account and call it their emergency fund. Doing this creates constant mental friction because you never know how much of that cash is actually available to protect you from a true financial crisis.
⚠️ Costly Mistake: The “Fake Emergency” Trap
Replacing worn-out brake pads is not an emergency; it is an inevitable cost of owning a vehicle. When you raid your emergency fund to pay for predictable maintenance, you leave yourself completely vulnerable to real crises like sudden unemployment or unexpected hospital stays.
Actionable Next Step: Review your bank statements from the past twelve months. Write down every expense over $150 that made you feel financially squeezed, and flag whether it was a genuine surprise or an inevitable cost you simply forgot to plan for.
7 Sinking Fund Categories Every Budgeter Should Consider
While you can create a sinking fund for virtually any future expense, you do not need twenty different categories when you are just getting started. Focus first on the seven areas where everyday American households face the most frequent cash-flow surprises:
Actionable Next Step: Select just two or three categories from this table that cause you the most stress right now. Do not try to fund all seven simultaneously on day one. Master the habit with a few core bills first, then expand your categories over time.
How to Calculate Your Sinking Fund Targets
The math behind a sinking fund is straightforward. You only need to know three numbers:
- The Target Cost: How much the bill will cost in total.
- The Current Balance: Any money you have already saved for it.
- The Number of Paychecks Left: How many times you will be paid between today and the due date.
Here is the core formula:
Payday Transfer Amount = (Target Cost − Current Balance) ÷ Remaining Paychecks
For instance, if your car tags cost $240, you currently have $0 saved, and your registration is due in four months, your savings target depends entirely on how often you get paid:
- Monthly Pay (4 checks): $240 ÷ 4 = $60.00 per paycheck
- Biweekly Pay (8 checks): $240 ÷ 8 = $30.00 per paycheck
- Weekly Pay (16 checks): $240 ÷ 16 = $15.00 per paycheck
Interactive Tool: Sinking Fund Paycheck Calculator
Use the calculator below to plug in your upcoming bills and find out your exact per-paycheck savings target in real time:
Sinking Fund Paycheck Calculator
Calculate the exact amount to transfer to your High-Yield Savings Account (HYSA) every payday.
Transfer Every Payday
Calculating your savings plan…
Actionable Next Step: Run your single largest non-monthly expense through the calculator above right now. Write down your per-paycheck target on a sticky note or in your phone’s notes app.
Where Should You Keep Your Sinking Fund Money?
The single most important rule of sinking funds is this: never leave this money in your primary checking account.
When money sits in your main checking account, your brain treats it as spendable cash. You check your bank balance on a Friday afternoon, see an extra $500, and assume you have plenty of room to eat out or splurge on weekend shopping. You end up accidentally spending your auto insurance money on discretionary purchases without even realizing it.
The Ideal Vehicle: High-Yield Savings Accounts (HYSA)
A High-Yield Savings Account (HYSA) is the premier tool for sinking funds. Unlike traditional brick-and-mortar savings accounts that often pay near-zero yields (such as 0.01%), an HYSA can pay a competitive Annual Percentage Yield (APY) that helps your cash grow safely until your bills come due.
Keeping your sinking funds in an HYSA provides three major advantages:
- Friction Against Impulse Spending: Moving cash out of checking creates a psychological barrier. It forces you to pause and intentionally transfer the money before you can spend it.
- High Liquidity: Unlike Certificates of Deposit (CDs), which lock up your cash for fixed terms, savings account funds remain accessible whenever an annual bill comes due.
- Federal Protection: Make sure your account is held at an institution backed by the Federal Deposit Insurance Corporation (FDIC) or the National Credit Union Administration (NCUA). This guarantees that your deposits are insured up to $250,000 per depositor, per institution.
ℹ️ What About Bank “Buckets”?
Several online institutions (like Ally Bank, Capital One, or SoFi) allow you to divide a single savings account into digital “buckets” or sub-accounts. If your bank offers this feature, it makes visual tracking easy. But if your bank does not offer buckets, you do not need to switch banks or open ten separate accounts—you can track everything using our spreadsheet system below.
Actionable Next Step: If you are still earning 0.01% on your short-term savings at a legacy bank, open a fee-free, FDIC-insured High-Yield Savings Account this week so your money earns interest while you save.
How to Track Multiple Sinking Funds (Without Opening 10 Bank Accounts)
A common beginner mistake is trying to open a separate savings account for every single expense: one for car repairs, one for Christmas, one for pet care, and one for insurance. Within two months, managing logins, account numbers, and transfers across multiple accounts becomes overwhelming.
The smarter approach is to hold all of your sinking funds in one single HYSA balance, while using a virtual ledger to manage where every dollar belongs. Your bank holds the lump sum; your tracking tool assigns the jobs.
The TalkBudget Sinking Fund Tracker (Google Sheets)
To eliminate manual math, we built the TalkBudget Sinking Fund Tracker, a free three-tab Google Sheets template designed to put your non-monthly bills on autopilot:
- Tab 1: Sinking Fund Dashboard: Displays your target costs, due dates, automated progress sparklines, and calculates your exact monthly and biweekly obligations. It also features an automated bank reconciliation block to ensure your ledger always matches your real-world HYSA balance.
- Tab 2: Payday Allocation Splitter: Connects directly to your direct deposit paycheck. You input your take-home pay and your immediate living expenses (rent, groceries), and the sheet tells you the exact lump sum to move to your HYSA, leaving you with a crystal-clear “safe-to-spend” checking balance.
- Tab 3: Transaction Ledger: A running record of your deposits and spending. When you pay a bill or deposit cash on payday, log it once in the ledger, and the dashboard automatically updates your balances.
✅ Free Template Download:
You can download your free copy of the spreadsheet right here: Download the TalkBudget Sinking Fund Tracker (Google Sheets). Click “Make a Copy” to save your personal version directly to your Google Drive.
Actionable Next Step: Make a copy of the tracker, enter your top three upcoming expenses on the Dashboard tab, and customize your target due dates.
3 Steps to Start Your First Sinking Fund Today
Setting up your sinking fund system does not take hours of complicated financial planning. You can get fully up and running in fifteen minutes by following these three steps:
Step 1: Pick Your Single Most Stressful Non-Monthly Expense
Do not try to overhaul your entire financial life in one sitting. Think about the one expense that caused you the most panic last year. Was it buying holiday presents on a high-interest credit card? Was it a $400 car registration fee? Choose that single bill as your starting point.
Step 2: Calculate Your Per-Paycheck Target
Check the calendar to see when that bill is due. Divide the total bill amount by the number of paychecks you will receive between now and the due date, or plug your numbers into the interactive calculator above. That number is your official payday contribution.
Step 3: Automate Your Transfer on Payday Morning
Do not rely on willpower or memory. Log in to your checking account online portal and schedule an automatic recurring transfer to your savings account for the morning your paycheck deposits. When the cash transfers automatically before you begin your day, you remove the temptation to spend it.
💡 Advice & Pro-Tip: The “Single Transfer” Habit
Even if you are tracking five different sinking fund categories in your spreadsheet, make one single transfer from your checking account to your savings account on payday. Let your tracking spreadsheet handle the categorization so your banking routine stays simple and effortless.
📌 Quick Takeaway
A $1,200 annual bill feels overwhelming when it hits your checking account all at once, but it is just $46.15 per biweekly paycheck when planned over 12 months. Breaking lump-sum expenses down to their per-paycheck cost turns potential financial emergencies into ordinary, predictable line items and protects your real savings balance permanently.
TalkBudget provides general educational content and is not a registered financial advisor or CPA. Please consult a qualified professional before making major financial decisions.
How to Make an Emergency Fund Last Through a Crisis
When an unexpected financial shock hits—whether it is a sudden layoff, an unexpected medical diagnosis, or a painful divorce—the instinct to freeze is completely normal. However, knowing how to make an emergency fund last through a crisis comes down to immediate, decisive triage: slashing your spending to a bare-bones baseline on day one, calculating your exact cash runway, ruthlessly prioritizing essential survival bills over unsecured debts, and securing hardship deferrals before missing a single payment.
The biggest mental hurdle during a crisis is the paralyzing guilt of watching your hard-earned savings balance drop. If you spent years steadily building your safety net, spending it feels counterintuitive. Remember this: tapping your savings right now is not a failure. It means your fund is doing the exact job it was created to do—keeping a roof over your head and preventing you from spiraling into toxic, double-digit debt. If you are reading this before an emergency happens to prepare your household, take a moment to review our foundational guide on The Importance of an Emergency Fund to see how cash reserves form the bedrock of your financial security.
Step 1: Shift to a “Bare-Bones” Budget on Day One
The most common and costly mistake people make during a sudden income loss is waiting 30 to 60 days to cut expenses, hoping the crisis will quickly resolve on its own. Continuing your regular lifestyle for just one or two months can easily wipe out 40% of your total reserves. To protect your capital, you must pivot to a “bare-bones” budget immediately.
A bare-bones budget strips your monthly cash outflow down strictly to biological and legal survival needs. That means immediately pausing:
- Dining out, takeout, and daily coffee runs
- Streaming services, subscription boxes, and gym memberships
- Clothing purchases, home decor, and consumer electronics
- Extra principal payments on low-interest mortgages or student loans
- Contributions to your taxable brokerage accounts, Traditional Individual Retirement Account (IRA), or Roth IRA
If you are facing job loss or a drastic reduction in household hours, you must also look at retirement contributions taken out of your paycheck. While halting retirement investments is painful, continuing to fund a 401(k) or 403(b) while you cannot pay for groceries makes little sense. Unless your employer offers an immediate, dollar-for-dollar match that you can borrow against without penalty, temporarily pause retirement withholding to maximize liquid cash in your checking account right now.
💡 Advice & Pro-Tip: The 15-Minute Subscription Audit
Log into your primary checking account and credit card portals. Pull up recurring recurring charges from the last 60 days. Cancel every single auto-renewal that does not directly keep you fed, warm, or employable. You can always resubscribe once your income stabilizes.
Your Next Step: Print or download your last 30 days of bank and card transactions tonight. Highlight every non-essential purchase in yellow, cancel recurring services immediately, and total up the monthly cash you just reclaimed.
Step 2: Calculate Your True Cash Runway
To navigate an emergency with confidence, you need an exact timeline rather than an anxious guess. Your “cash runway” is the precise number of months and weeks your household can survive before your liquid accounts hit zero.
Use this direct formula to calculate your runway:
Cash Runway (Months) = Total Liquid Cash Available ÷ (Monthly Bare-Bones Expenses − Guaranteed Interim Income)
When compiling your total liquid cash, count funds held in checking accounts and your High-Yield Savings Account (HYSA). These accounts are protected by the Federal Deposit Insurance Corporation (FDIC) or the National Credit Union Administration (NCUA) for credit unions, guaranteeing your principal remains stable. However, be mindful of transfer friction. An Automated Clearing House (ACH) transfer between an online HYSA and your everyday brick-and-mortar checking account usually takes one to three business days. Keep at least two to three weeks of immediate survival expenses in your checking account so an ACH delay never triggers an overdraft fee.
Avoid tapping Certificate of Deposit (CD) accounts if early withdrawal penalties will swallow months of accrued interest, unless you have completely exhausted standard savings.
Here is a real-world look at how drastically your cash runway expands when you combine aggressive spending cuts with modest interim income:
Your Next Step: Plug your current cash balances and bare-bones expenses into the formula above. Write your exact runway number in weeks on a sheet of paper so you know your timeline.
Step 3: Triage Your Bills (The “Four Walls” Hierarchy)
When money runs tight, people frequently panic about their credit standing. They pay the minimum on three department store credit cards while falling short on their rent or grocery bill. During a genuine financial storm, you must discard that thinking entirely: cash preservation and survival always outrank your credit score.
A dinged FICO Score (created by the Fair Isaac Corporation) can be rebuilt once your household is stable. An eviction notice or utility shutoff cannot be brushed aside. Triage your outflow using this four-tier hierarchy:
Tier 1: The Four Walls (Non-Negotiable)
These expenses keep your body safe, healthy, and sheltered. Nothing else gets paid until these are accounted for:
- Food: Modest grocery purchases (staples, batch meals, store brands). No dining out.
- Shelter: Your rent or primary mortgage payment.
- Basic Utilities: Electricity, water, sewer, and home heating fuel/natural gas.
- Critical Healthcare: Essential prescription drugs and required medical supplies.
Tier 2: Earning & Communication Enablers
You cannot search for work, interview remotely, or receive unemployment updates if you are cut off from the world. Maintain a basic cell phone line and your home internet package. If necessary, downgrade high-speed data tiers to entry-level pricing plans.
Tier 3: Secured Debts
If you need your vehicle to get to job interviews or commute to odd jobs, your auto loan and minimum auto insurance take priority over uncollateralized bills. Falling behind on a car loan can lead directly to repossession.
Tier 4: Unsecured Debts (Pay Last or Negotiate)
Credit cards, medical bills, personal signature loans, and retail store accounts fall squarely into Tier 4. While late payments on these accounts may be reported to consumer reporting bureaus like Experian, Equifax, and TransUnion, unsecured creditors cannot seize your home or repossess your groceries to satisfy an unpaid balance.
⚠️ Danger: Never Drain Cash to Pay Off Promotional 0% APR Balances
A catastrophic mistake during a cash crunch is throwing $3,000 of emergency savings at a credit card balance simply because the 0% Annual Percentage Rate (APR) window is expiring next month. Giving away your cash eliminates your safety net. In an active crisis, pay only the minimum required balance to stay current and hold onto your cold, hard cash reserves.
Your Next Step: Group your monthly bills into these four tiers. If your cash flow does not cover everything, draw a line right beneath Tier 2 and prepare to negotiate everything below it.
Step 4: Contact Creditors and Request Hardship Forbearance
Do not wait until you have missed three payments and collection agencies start calling. Creditors, mortgage servicers, and utility providers are far more willing to work with consumers who reach out proactively before falling into delinquency.
Most major credit card issuers and banks operate dedicated “Financial Hardship Departments” overseen by standard industry practices and guidelines encouraged by the Consumer Financial Protection Bureau (CFPB). Programs often include temporary interest rate reductions, fee waivers, or 60- to 90-day payment deferrals.
When you call, avoid over-explaining or getting emotional. Be direct, professional, and clear about your situation. Use this script:
“Hello, my name is [Your Name]. I am calling because my household has experienced a sudden, unexpected [job loss / medical emergency / income reduction]. I want to ensure my account stays in good standing with you, but I need temporary financial relief. Could you please connect me with your Financial Hardship Department to review payment forbearance, interest rate reduction, or fee waiver programs available for my account?”
Apply this exact approach across multiple areas of your life:
- Electric and Gas Utilities: Request placement on “Budget Billing” or ask about emergency moratorium protections and state assistance grants.
- Auto Lenders: Request a one- or two-month loan extension, which pushes current payments to the back end of the loan term.
- Student Loans: If you hold federal student loans, apply for income-driven repayment plans or temporary administrative forbearance through the Department of Education.
- Landlords: Speak with your landlord honestly. Propose paying a reduced sum on the first of the month and the remainder on the fifteenth, or ask to draw temporarily against your security deposit if permitted by state housing laws.
Your Next Step: Pick up your phone and call your two largest non-housing creditors today. Ask specifically for their hardship representative and write down the terms of any payment relief offered.
Step 5: Slow the Cash Burn with Interim Income and Community Resources
Preserving your emergency fund is not just about cutting what goes out; it is also about supplementing what comes in. Every single dollar you bring in through temporary work or social programs extends your cash runway by another day.
1. File for State Unemployment Insurance Immediately
If you were laid off or had your hours cut through no fault of your own, submit your state unemployment insurance claim on day one. Far too many workers wait weeks out of pride or the belief that they will land another role instantly. State processing times commonly take two to four weeks before the first direct deposit arrives in your checking account. Do not leave money on the table that you have earned through your payroll taxes.
2. Utilize Community Safety Nets Without Hesitation
Public safety nets exist specifically for moments like this. Freeing up $400 a month on food costs by tapping into local resources directly protects $400 of your emergency fund cash:
- SNAP: Check your household income eligibility for the Supplemental Nutrition Assistance Program (SNAP) through your state’s human services agency.
- Local Food Pantries: Community pantries, faith-based organizations, and regional food banks provide fresh produce, non-perishables, and pantry staples with minimal documentation.
- LIHEAP: Apply for the Low-Income Home Energy Assistance Program (LIHEAP) to help offset winter heating or summer cooling electric bills.
3. Generate Rapid “Bridge” Cash
Turn idle assets into immediate liquidity. Selling high-value personal items you no longer use—such as a backup laptop, unused musical instruments, or excess furniture—via local marketplace platforms can inject $500 to $1,500 of fresh cash into your checking account within 48 hours.
Additionally, look for flexible, temporary work. Even taking on 1099 independent contractor delivery work, seasonal retail shifts, or pet-sitting for neighbors can generate $150 to $300 a week. That small inflow covers basic groceries and stops you from liquidating your core savings principal.
Your Next Step: Submit your state unemployment application online today, and research your county’s local food pantry distribution dates this week to lower your grocery cash burn.
Critical Pitfalls: What NOT to Do During a Crisis
When panic sets in, it is easy to make rash moves that trade a short-term reprieve for long-term disaster. As you manage your fund, steer clear of these major traps:
- Raiding Retirement Accounts Early: Pulling funds from a 401(k) or Traditional IRA triggers ordinary income tax brackets and an immediate 10% early withdrawal penalty from the Internal Revenue Service (IRS) if you are under age 59½. Unless you qualify for specific hardship distributions, leave your retirement accounts alone.
- Turning to Predatory Debt: Avoid payday loans, auto-title loans, and high-interest cash advances. A short-term loan with a 400% APR creates an inescapable debt spiral far more dangerous than the original financial emergency.
- Failing to Monitor Joint Accounts: In multi-earner households, emotional tension can lead to miscommunication. Hold a 10-minute daily budget alignment meeting with your partner to confirm every dollar exiting your checking account.
For a detailed breakdown of traps that catch savers off guard, make sure to read our dedicated breakdown on Emergency Fund Mistakes to Avoid.
Your Next Step: Place a freeze or sticky note on your credit cards to remind yourself: no high-interest borrowing and no early retirement withdrawals while working through this plan.
Recovery: Rebuilding Your Cushion Once the Storm Passes
Every storm eventually passes. You land a new role, receive a medical clearance, or resolve your household disruption. When steady paychecks resume, you will likely feel the urge to celebrate with a major shopping trip or an expensive dinner out. Resist that temptation for just a little longer.
Exit emergency mode methodically using this three-phase restocking sequence:
- Bring Delinquencies Current: If you used hardship forbearance programs or delayed Tier 4 bills, contact those lenders and settle past-due balances before interest penalties compound.
- Restore Essential Quality-of-Life Spending: Add back sensible items like routine home maintenance, dental cleanings, and modest recreational activities.
- Refill Your HYSA Automatically: Re-establish automatic transfers on every payday until your emergency fund returns to its full three-to-six-month target. If you need a refresher on establishing automated savings habits, read our actionable guide on Starting an Emergency Fund from Scratch.
📌 Quick Action Checklist: Surviving the Cash Crunch
- Day 1: Cut all non-essential recurring expenses and pause extra retirement savings.
- Day 2: Calculate your exact cash runway formula (Cash ÷ Monthly Net Burn).
- Day 3: Categorize bills by the Four Walls (Food, Shelter, Utilities, Transport).
- Day 4: File for unemployment and call lenders to request hardship deferral options.
- Weekly: Monitor bank balances daily and supplement cash flow with temporary income.
An emergency fund is not an untouchable trophy to be admired from afar; it is an active financial shock absorber built to protect your family during life’s hardest moments. Cut deep early, communicate clearly with your creditors, protect your essentials first, and trust your plan to carry you safely through to the other side.
Be sure to read these essential guides too!
The importance of an emergency fund Find out what an emergency fund is and why you need one!
Starting an Emergency Fund from Scratch How to build a fund step by step and not get overwhelmed.
Emergency Fund Mistakes to Avoid Keep your savings resilient through every stage of life.
Editorial Disclaimer: TalkBudget provides general educational content and is not a registered financial advisor or CPA. Please consult a qualified professional before making major financial decisions.
7 Costly Emergency Fund Mistakes to Avoid (And How to Fix Them)
ℹ️ The Golden Rule of Emergency Reserves:
Your emergency fund has one job: capital preservation and immediate liquidity. Return of your capital always matters far more than the return on your capital.
Mistake 1: Leaving Your Safety Net in a Traditional Checking or Savings Account
Keeping your emergency cushion parked inside your everyday checking account—or in a standard brick-and-mortar savings account—creates two significant problems: accessibility temptation and inflation loss.
First, when emergency reserves sit alongside daily spending money, the psychological boundary blurs. A weekend getaway or an expensive home decor purchase suddenly feels affordable because your checking balance looks flush. Second, traditional brick-and-mortar banks pay an average Annual Percentage Yield (APY) of just 0.01% to 0.05%. With inflation eroding consumer purchasing power every year, holding $10,000 in a traditional savings account guarantees a real financial loss over time.
The solution is parking your reserves in an online High-Yield Savings Account (HYSA). An HYSA provides competitive yields while keeping your principal safe through the Federal Deposit Insurance Corporation (FDIC) or the National Credit Union Administration (NCUA) for credit unions, insuring deposits up to $250,000 per depositor, per insured institution.
Next Step: Open an external HYSA at a reputable, FDIC-insured online institution. Keep it disconnected from your physical ATM debit card to create a natural 24- to 48-hour transfer buffer against impulse spending.
Mistake 2: Investing Your Cushion in the Stock Market or Crypto
When you watch cash sit idle while the stock market climbs, it is tempting to think: “Why keep $15,000 earning a modest yield when an index fund or tech stock could earn 10% or more?”
This line of thinking misses how financial crises work in the real world. Emergencies do not happen in isolation; they are frequently correlated with broader economic downturns. If a recession hits, company layoffs and market contractions tend to arrive at the same time. If you lose your job while the S&P 500 drops 25%, you may be forced to liquidate your shares at a massive paper loss just to pay rent and buy groceries.
Understanding the importance of an emergency fund starts with accepting that its value is measured by emotional stability and crisis defense, not portfolio returns. Stocks, mutual funds, exchange-traded funds, and cryptocurrencies carry capital risk and belong strictly in your wealth-building portfolio, never in your baseline safety net.
Next Step: Keep your investing goals inside dedicated accounts—such as a 401(k), an Individual Retirement Account (IRA), or a standard brokerage account—and keep your emergency reserve strictly in zero-volatility, cash-equivalent savings.
Mistake 3: Sacrificing Liquidity in Inflexible Products
Liquidity describes how quickly and easily you can convert an asset into spendable cash without losing value. A common mistake among optimization-minded savers is locking their emergency money away in exchange for a tiny rate premium.
Locking funds inside a 12-month or 5-year Certificate of Deposit (CD) might sound harmless until a sudden plumbing disaster or medical bill requires payment by Friday afternoon. Breaking a CD early triggers an early withdrawal penalty, often forfeiting several months of interest. Similarly, relying on a Roth IRA contribution withdrawal takes multiple business days to settle and clear, leaving you stranded if you face an immediate cashier’s check requirement.
💡 Advice & Pro-Tip: The Two-Tier Liquidity Strategy
To get both instant access and maximum interest, divide your emergency fund into two tiers:
• Tier 1 (Immediate Buffer): Keep $1,000 to $2,000 in a savings account at your local bank for same-day, instant cash transfers.
• Tier 2 (Core Reserve): Keep the remaining 3 to 6 months of expenses in an external HYSA earning a top-tier yield, accessible via Electronic Funds Transfer within 1 to 2 business days.
Next Step: Check your bank’s transfer terms today. Confirm how many business days an external transfer takes so you are never surprised during a Friday night emergency.
Mistake 4: Confusing an Emergency Fund with a Sinking Fund
One of the most frequent reasons people feel like their emergency fund never grows is that they drain it for expenses that were never actually emergencies. A blown transmission is an emergency; your semi-annual auto insurance premium is not.
This is where sinking funds come in. A sinking fund is money set aside incrementally every month for an expense you know is coming eventually, even if the exact timing or amount varies slightly. When you use your emergency fund for regular maintenance or predictable events, you leave yourself exposed when a real disaster strikes.
The 3-Question Emergency Litmus Test
Before tapping your emergency fund, ask yourself these three simple questions:
- Is it unexpected? Routine holidays, birthdays, tire rotations, and back-to-school clothes are fully predictable calendar events. A sudden tooth extraction or a broken hot water heater is unexpected.
- Is it absolutely necessary? A working laptop for a remote job is necessary. Upgrading to a newer phone model because yours has scratches is a want.
- Is it urgent? Does it require immediate payment to preserve your health, your home, or your employment? If it can be postponed to next month’s paycheck, it is not an emergency.
🎯 The Sinking Fund Solution:
Open separate sub-savings accounts within your banking app labeled specifically for recurring, irregular costs: Car Repairs, Vet Visits, Home Maintenance, and Annual Subscriptions. Fund them with automated monthly transfers so your true emergency reserve stays untouched.
Next Step: Review your bank statements from the past 12 months. Identify two large irregular bills that caught you off guard and set up automated sinking funds for them this week.
Mistake 5: Treating Credit Cards or Home Equity as Your Backup Plan
It is common to hear people say: “I don’t need a cash emergency fund because I have a credit card with a $15,000 limit,” or “I can always draw on my Home Equity Line of Credit (HELOC).”
Relying on borrowed money as an emergency plan is a dangerous gamble. First, credit cards carry an average Annual Percentage Rate (APR) exceeding 20% to 25%. If you face an emergency accompanied by an income drop (like a layoff or medical disability), financing your life on high-interest credit cards quickly creates an aggressive debt spiral that takes years to escape.
Second, lines of credit are not guaranteed. During recessions or credit contractions, banks systematically manage their own balance sheets by slashing credit limits, freezing HELOCs, and closing dormant credit card accounts—often without warning. Just when you need that line of credit most, the lender can legally pull the rug out from under you.
⚠️ The High Cost of Debt as an “Emergency Fund”:
Charging a $5,000 unexpected repair to a credit card at a 22% APR while paying only the minimum monthly balance will take over 15 years to pay off and cost you more than $6,200 in interest alone. Cash reserves turn an emergency into a minor inconvenience; credit cards turn an emergency into a long-term debt burden.
Next Step: You can still swipe your rewards credit card to pay the emergency contractor or mechanic to earn cash-back points—provided you transfer the cash from your HYSA to pay the card off in full before the billing cycle closes.
Mistake 6: Setting a Static Target and Forgetting Life Changes
Many savers calculate an emergency fund target once and never look at the math again. A $5,000 reserve might have covered six months of rent and groceries when you were a single renter sharing an apartment in your early twenties. But if you now own a home, have two children, and make monthly car payments, that same $5,000 might only last three weeks.
Your target emergency fund size should be based on your current essential monthly expenses (your “bare-bones budget”), not your gross income or an arbitrary flat number. Review these primary household factors to find your target tier:
- 3 Months of Core Expenses: Ideal for dual-income households where both partners earn steady W-2 salaries in stable, in-demand industries, with no dependents and minimal fixed debt.
- 6 Months of Core Expenses: The standard benchmark for single-income households, families with dependents, homeowners, or workers in volatile corporate sectors.
- 9 to 12 Months of Core Expenses: Recommended for 1099 independent contractors, freelancers, business owners, or commission-based sales workers whose monthly cash flow fluctuates significantly throughout the year.
If looking at those numbers feels intimidating, remember that building financial defense is an incremental process. Check out our beginner guide to starting an emergency fund from scratch to build your first reliable milestone without getting overwhelmed.
Next Step: Add up your mandatory monthly baseline expenses: housing, utilities, minimum debt payments, essential groceries, medications, and insurance. Multiply that baseline by your target months to verify whether your current savings match your actual risk profile.
Mistake 7: Not Having a Plan to Rebuild After an Emergency
The entire point of an emergency fund is to spend it when a legitimate crisis occurs. You should never feel guilt or shame for draining your account to replace a dead furnace or bridge the gap during a job transition. That means your fund did its job perfectly.
The mistake happens in the aftermath: failing to prioritize refilling the account once the storm passes. Leaving your emergency fund depleted leaves you completely vulnerable if a second, unrelated crisis hits shortly after. If you are currently working your way through a crisis, review our operational guide on how to make an emergency fund last through a crisis to protect every dollar.
Once stability returns, initiate an immediate “Replenishment Sprint.” Temporarily pause extra principal payments on low-interest debt, adjust discretionary dining and entertainment budgets, and redirect those extra cash flows straight back into your HYSA until your baseline reserve is fully restored.
Next Step: Draft a simple written rule for yourself: “Any time my emergency reserve drops below my baseline target, I will pause non-essential savings goals and redirect $X per month until it is back to full strength.”
📌 The 5-Minute Emergency Fund Stress-Test Checklist
Run through this quick audit to ensure your financial safety net is crisis-ready:
- Is your money stored in an FDIC- or NCUA-insured account separate from daily checking?
- Can you access at least $1,000 immediately without incurring early withdrawal penalties or tax headaches?
- Is your total target based on current essential monthly expenses rather than an outdated number?
- Are predictable annual costs (car tires, vet checkups, insurance premiums) isolated in dedicated sinking funds?
- Do you have an automated monthly transfer set up to maintain and grow your reserves?
Be sure to read these essential guides too!
The importance of an emergency fund Find out what an emergency fund is and why you need one!
Starting an Emergency Fund from Scratch How to build a fund step by step and not get overwhelmed.
How to Make an Emergency Fund Last Through a Crisis How not to burn through your fund when the worst has happened.
TalkBudget provides general educational content and is not a registered financial advisor or CPA. Please consult a qualified professional before making major financial decisions.
Starting an Emergency Fund from Scratch
If you check your bank balance right now and see double digits—or even zero—you are not alone. When mainstream finance experts insist that you need three to six months of living expenses ($10,000 to $20,000) tucked away before you can breathe, it is easy to throw your hands up and quit before you even begin. When you are living paycheck to paycheck, saving ten thousand dollars sounds about as realistic as buying a private island.
Here is the truth: you do not need six months of expenses today. Your only job right now is to build an immediate starter cushion of $500 to $1,000. That small buffer is the firebreak that stands between you and high-interest credit card debt or a predatory payday loan when life inevitably happens. If you want to explore the deep psychological peace of mind that a fully funded safety net provides, be sure to read our foundation guide on The Importance of an Emergency Fund. But if your savings account is sitting at zero today, let’s roll up our sleeves and build your first safety net from the ground up.
Step 1: Ditch the “6-Month” Myth & Climb the Micro-Buffer Ladder
The biggest enemy of saving money is psychological paralysis. When a goal feels impossibly distant, your brain decides that saving $15 or $20 this week is pointless. But personal finance is built on momentum, not perfection.
Instead of staring at a massive mountain, we use the Micro-Buffer Ladder. This framework breaks down your savings journey into three bite-sized, achievable milestones. You do not worry about Step 2 until Step 1 is safely locked in your account.
🎉 Milestone Win:
The day your balance hits Level 1 ($250), pause and celebrate. You have officially insulated yourself against the everyday cash emergencies that send most households into a downward spiral of high-interest debt.
Actionable Next Step: Write “$250” on a sticky note and put it on your fridge or bathroom mirror. Ignore the $1,000 target for now—Milestone 1 is your only mission.
Step 2: The 7-Day “Found Money” Audit (Scrape Up Your First $100 to $250)
When you are already balancing rent, groceries, and utility bills, finding extra cash can feel impossible. But most household budgets suffer from silent micro-leaks. You do not need a promotion to start your emergency fund; you just need to run a fast, focused audit to reclaim what is already slipping away.
Here is how to run our 7-Day “Found Money” Audit to kickstart your fund this week:
- Days 1–2: The Subscription Sweep. Open your primary checking account statement from the last 30 days. Highlight every recurring charge. Cancel dormant gym memberships, streaming services you haven’t watched in two weeks, and premium app trials. Aim to free up at least $30 to $50 a month right here.
- Days 3–4: The “One-Item Declutter” Rule. Walk through your living room, closet, or garage. Find one item collecting dust that holds resale value—an unused video game console, an old acoustic guitar, baby gear your child has outgrown, or workout weights. List it on Facebook Marketplace or OfferUp for a fair price. A single transaction can immediately fund your Level 1 goal ($250).
- Day 5: The Utility & Bill Checkup. Call your auto insurance carrier or cell phone provider. Ask for available promotional rates, check for safe-driver discounts, or adjust policy options to lower your monthly premium without compromising core coverage.
- Days 6–7: The “Pantry Raid” Weekend. Challenge yourself to skip the grocery store and takeout for two consecutive days. Plan meals strictly around the pasta, canned beans, rice, and frozen vegetables already sitting in your cupboards. Route the $40 to $75 you would have spent directly into your fund.
💡 Advice & Pro-Tip:
Treat unexpected windfalls like found money. Whenever you receive a modest tax refund from the IRS, a birthday cash gift, or a small overtime bonus on your paystub, transfer at least 50% into your emergency fund before your checking account absorbs it.
Actionable Next Step: Open your banking app today, look back 30 days, and cancel exactly one recurring subscription you rarely use.
Step 3: Park It Where You Won’t Touch It (Account Mechanics)
One of the most common mistakes people make when building an emergency fund is leaving the cash inside their everyday checking account. When your emergency savings sits right next to your gas and grocery money, lifestyle creep happens automatically. You check your balance, feel artificially flush, and spend your emergency buffer on dinner with friends.
Your emergency fund needs a home that offers two essential features: safety and intentional friction.
The ideal vehicle is an online HYSA [High-Yield Savings Account]. Unlike traditional brick-and-mortar savings accounts that often pay negligible interest (around 0.01%), an HYSA can pay a competitive APY [Annual Percentage Yield], allowing your cash to grow safely while staying liquid.
ℹ️ Account Mechanics & Insurance:
Always ensure your HYSA is held at an institution backed by the FDIC [Federal Deposit Insurance Corporation] (for banks) or the NCUA [National Credit Union Administration] (for credit unions). Both agencies insure your deposits up to $250,000 per depositor, making your cash virtually risk-free from market drops.
Keeping your fund at a separate online bank also creates a healthy barrier: moving money back to your checking account typically takes one to two business days. That brief delay eliminates impulsive spending while ensuring your funds are readily accessible for real emergencies.
⚠️ The Debit Card Trap:
When opening your HYSA , decline the debit card or ATM card if the bank offers one. Having an ATM card in your wallet completely destroys the healthy friction that keeps your emergency stash safe from impulse buys.
Actionable Next Step: Open an FDIC or NCUA insured High-Yield Savings Account that requires no minimum opening deposit and charges zero monthly maintenance fees.
Step 4: Automate with the “Invisible Savings” Payroll Split
Relying on willpower to save money fails almost every single time. If your plan is to spend your paycheck throughout the month and save “whatever is left over,” you will consistently find that nothing is left over.
To succeed from scratch, you must make your savings invisible. You do this through a direct deposit payroll split:
- Log into your workplace payroll portal. Whether your company uses ADP, Gusto, Workday, or a manual paper form with human resources, almost all W-2 employers allow you to split your paycheck across multiple accounts.
- Designate a fixed dollar amount. Direct $25 or $50 per pay period into your new High-Yield Savings Account, with the remaining balance flowing into your primary checking account.
- Forget it exists. Because that money never touches your everyday checking account, you never mentally categorize it as spendable income.
If you are an independent contractor or 1099 worker, you can achieve the exact same result by setting up an automatic recurring bank transfer from your business checking to your High-Yield Savings Account every Monday or biweekly pay date.
Consider the math: setting aside just $25 a week puts $1,300 into your account over a single year—completely bypassing your checking account without painful lifestyle sacrifices.
Actionable Next Step: Log into your employer’s payroll portal today and set up a $25 per-paycheck split directly to your savings account.
Step 5: The 3-Question Litmus Test (Protecting Your Cushion)
Building your first $500 or $1,000 takes deliberate effort, which means you must guard it aggressively. When unexpected costs pop up, it can be tempting to declare everything an emergency. A flash sale on airline tickets or an annual car registration bill are not emergencies.
Before withdrawing a single dollar from your fund, run the expense through our 3-Question Litmus Test:
📌 The 3-Question Emergency Litmus Test
- 1. Is it unexpected? (A blown radiator is unexpected; your semi-annual car insurance premium or holiday gifts are predictable expenses that belong in your regular budget.)
- 2. Is it absolutely necessary? (Fixing a leaking roof over your kitchen is essential; upgrading your couch because of cosmetic wear is not.)
- 3. Is it urgent? (An urgent dental procedure cannot wait; purchasing new running shoes on sale can.)
If the expense does not pass all three questions, keep your emergency money locked away. Protecting your cash against false alarms is one of the most critical habits you can build—we dive deeper into this in our upcoming guide on Emergency Fund Mistakes to Avoid. And if you are currently facing a sudden job loss or income drop, check back soon for our comprehensive survival roadmap: How To Make An Emergency Fund Last Through A Crisis.
Actionable Next Step: Bookmark this 3-question filter on your phone browser or write it in your notes app so you can review it before tapping your emergency reserves.
Your First Step Off Zero
Starting an emergency fund from scratch is not about getting rich overnight—it is about purchasing personal dignity, security, and breathing room. When you have even $500 set aside in a secure account, the world feels different. A sudden flat tire or an urgent doctor visit shifts from an anxiety-inducing disaster into a manageable inconvenience.
Do not worry about saving six months of living expenses today. Focus exclusively on your first $250. Run your 7-day audit, open a dedicated account, split your next paycheck, and celebrate every single milestone as you climb the ladder.
Be sure to read these essential guides too!
The importance of an emergency fund Find out what an emergency fund is and why you need one!
How to Make an Emergency Fund Last Through a Crisis How not to burn through your fund when the worst has happened.
Emergency Fund Mistakes to Avoid Keep your savings resilient through every stage of life.
Editorial Disclaimer: TalkBudget provides general educational content and is not a registered financial advisor or CPA. Please consult a qualified professional before making major financial decisions.
The Importance of an Emergency Fund: Why You Need One and How It Protects Your Wealth
An emergency fund is a dedicated cash cushion set aside strictly to cover life’s unexpected, urgent expenses—such as sudden medical bills, emergency car repairs, or unplanned job loss—without forcing you into high-interest debt. Rather than functioning as an investment designed to earn aggressive returns, an emergency fund operates as personal financial insurance. It creates a critical firewall between your daily livelihood and costly credit card balances or early retirement withdrawals.
If you feel anxious about your ability to handle a surprise $1,000 expense, you are in good company. More than 60% of Americans live paycheck to paycheck, leaving millions of working adults vulnerable to common financial shocks. The traditional advice to immediately stash away six months of living expenses often feels completely detached from reality when every dollar of your paycheck is already spoken for. The goal is not to hoard thousands of dollars overnight, but to break the exhausting cycle of panic and borrowing once and for all.
📌 The Real ROI of an Emergency Fund
The return on investment (ROI) of an emergency fund isn’t measured in stock market gains. It is measured in double-digit credit card interest avoided, retirement penalties prevented, and the mental peace of knowing a flat tire will not derail your month.
What Is an Emergency Fund (And What It Isn’t)?
To build a savings buffer that actually protects you, you must establish crystal-clear boundaries around what constitutes a true financial emergency. An emergency fund is not a slush fund for holiday shopping, a vacation booster, or money set aside for next summer’s concert tickets. It exists to solve immediate, involuntary crises that threaten your health, safety, or basic ability to earn an income.
Many budgeters accidentally drain their emergency savings because they confuse genuine emergencies with predictable, irregular expenses. If an expense happens every year—such as car registration renewals, holiday gifts, Amazon Prime memberships, or biannual auto insurance premiums—it is not an emergency. These planned non-monthly costs belong in dedicated sinking funds within your monthly budget.
ℹ️ The 3-Question Emergency Triage Filter
Before withdrawing a single dollar from your emergency reserves, run the expense through these three questions:
- Is it unexpected? Did this expense arise completely without warning (e.g., an urgent root canal vs. new winter tires you knew were bald)?
- Is it urgent? Does delaying payment for two weeks risk your physical health, your job security, or legal trouble?
- Is it necessary? Is this required for survival and baseline mobility, or is it a lifestyle convenience upgrade?
If the answer to all three is “yes,” tap the fund with zero guilt. If any answer is “no,” cash-flow it through your monthly budget adjustments instead.
Next Step: Review your recent bank statements and identify any recurring annual bills you treated as “surprises” last year. Move them into separate sinking fund categories so they stop competing with your emergency savings.
The True Cost of Relying on a Credit Card as Your “Backup Plan”
One of the most persistent personal finance myths is that an available line of credit eliminates the need for cash reserves. Treating a credit card as your emergency plan is like driving without an airbag because you happen to have a roll of bandages in the glove compartment.
When an emergency strikes and you carry no cash cushion, charging the expense to a high-interest credit card triggers the Debt Spiral. Consider a sudden $2,500 car transmission failure. If you charge that repair to a credit card carrying the national average APR of roughly 24% and pay only the minimum balance each month, here is the real damage:
- Total Time to Pay Off: Over 5 years of ongoing payments.
- Total Interest Paid: Over $1,800 in pure interest fees on top of the original bill.
- Total Financial Cost: That $2,500 transmission repair ultimately drains more than $4,300 out of your household cash flow.
⚠️ The Minimum Payment Trap & Credit Score Damage
Relying on credit in an emergency does not just cost you interest; it spikes your credit utilization ratio—a major scoring factor for both your FICO Score and VantageScore. A drop in credit score can quietly increase your auto insurance rates, disqualify you from apartment leases, and raise your interest rates across other lines of credit, compounding your financial distress.
Beyond the raw math, unbuffered emergencies inflict an invisible mental bandwidth tax. When you carry zero cash cushion, every minor hiccup—a $150 plumbing leak, a sick pet, an unexpected school fee—triggers immediate stress and marital friction. Cash reserves convert potential life crises into boring, manageable inconveniences.
Next Step: Check your current credit card APRs today. Knowing your exact rates will remind you why keeping cash in reserve is far cheaper than borrowing from a bank during an emergency.
How Much Do You Actually Need? (The “Core Survival” Formula)
Traditional finance books frequently insist on saving 3 to 6 months of full income. For someone currently living paycheck to paycheck on a $45,000 or $65,000 salary, being told to save $15,000 to $25,000 creates instant paralysis. When the goal looks impossible, most people simply give up and save nothing.
To overcome this hurdle, stop calculating your emergency fund based on your total gross pay or current discretionary lifestyle. Instead, calculate your Bare-Bones Survival Number. If you lost your job tomorrow, you would immediately cancel gym memberships, stop dining out, pause subscription services, and eliminate vacation spending.
Your Bare-Bones Survival Budget includes strictly the essentials:
- The “Core Four”: Housing (rent or mortgage), basic utilities (electric, water, gas, home internet), essential groceries (excluding restaurants and delivery), and basic transportation (car note, gas, transit pass, insurance).
- Minimum Debt Obligations: Minimum required payments on credit cards, student loans, and personal loans to keep your accounts in good standing.
- Essential Healthcare: Critical prescriptions and ongoing health insurance premiums.
For most households, this bare-bones number is 30% to 50% lower than their total monthly take-home pay, turning an intimidating target into an achievable project.
🎯 The 3-Tier Emergency Ladder
Build your cash reserve incrementally using these three manageable milestones:
- Tier 1: The $1,000 Starter Buffer. As outlined in our guide on how to start budgeting, saving an initial $1,000 provides immediate protection against 80% of everyday minor emergencies without taking on debt.
- Tier 2: One Month of Bare-Bones Expenses. Covers your survival essentials for 30 full days, giving you room to breathe if a paycheck is delayed or an unexpected medical deductible hits.
- Tier 3: The Full 3-to-6 Month Cushion. A complete reserve based on your household stability. Dual-income households with secure jobs often lean toward 3 months, while single earners, freelancers, and commission-based workers should target 6 months.
Next Step: Tally up your essential “Core Four” expenses and minimum debt payments. Multiply that number by one month to set your immediate Tier 2 savings target.
Where Should Your Emergency Fund Live?
An emergency fund has two non-negotiable rules: absolute capital preservation and immediate liquidity. You need to know that every single dollar you deposited will still be there when disaster strikes, and that you can access those funds within 24 to 48 hours.
Leaving your emergency fund inside your everyday checking account is a recipe for failure. When emergency savings sit mixed with daily spending money, the cash quietly erodes through accidental spending and lifestyle creep. Conversely, investing emergency cash in stocks, index funds, or cryptocurrency exposes you to brutal sequence-of-returns risk. If you lose your job during a broader economic recession, the market will likely be down simultaneously, forcing you to sell off assets at a steep loss just to pay rent.
The optimal home for your emergency fund is an online High-Yield Savings Account (HYSA) or a Money Market Account (MMA). These accounts offer full liquidity and are backed by the federal government—up to $250,000 per depositor through the FDIC at member banks or the NCUA at federal credit unions—while paying significantly higher yields than standard brick-and-mortar savings accounts.
Keeping your emergency savings in an HYSA at a separate bank from your daily checking account introduces helpful “friction.” Because transferring funds back to your primary checking account typically takes 24 to 48 hours, you eliminate the temptation to dip into your savings for impulse weekend purchases.
Next Step: Open an FDIC-insured High-Yield Savings Account with zero monthly maintenance fees and no minimum balance requirements to serve as your dedicated emergency vault.
How an Emergency Fund Shields Your Long-Term Wealth
An emergency fund does far more than keep you out of credit card debt; it safeguards your entire long-term investing strategy. Without cash reserves, sudden life disruptions force people to raid the wealth they have worked years to accumulate.
When unexpected emergencies strike, unprepared individuals frequently turn to early retirement account distributions, hardship withdrawals, or loans against their 401(k) or 403(b) plans. Tapping retirement accounts early is financially disastrous:
- IRS Tax Penalties: Non-qualified early distributions from traditional 401(k)s or IRAs typically incur ordinary income tax plus an immediate 10% IRS early withdrawal penalty.
- Permanent Loss of Compounding: Money pulled out of the market stops compounding permanently. Pulling $10,000 out of your retirement account in your thirties can easily cost you $80,000 or more in lost future retirement wealth over several decades.
- Loan Payback Traps: If you take a 401(k) loan and leave or lose your job, you may be required to repay the outstanding balance in full by the tax filing deadline for that year, or face having it classified as a taxable distribution.
💡 Career Leverage: The “Walk-Away” Fund
Having a fully funded emergency reserve gives you powerful career agency. When you have zero savings, you are forced to tolerate toxic management, wage stagnation, and hostile working environments out of sheer financial survival. A 3-to-6-month cash cushion gives you the leverage to walk away from predatory employers, negotiate assertively for promotions, or patiently search for the right career move rather than snatching the first desperate offer.
Next Step: Reframe your emergency fund not as idle cash losing value, but as a permanent bodyguard defending your retirement accounts and career autonomy.
How to Put Your Emergency Savings on Autopilot
Relying on leftover money at the end of the month to fund your emergency reserves rarely works. When you wait to see what is left over after 30 days of daily living, the answer is almost always zero.
The only consistent way to build a reliable emergency fund is to use the Pay-Yourself-First method. Rather than saving whatever scraps remain, you treat your emergency savings like an essential bill that must be paid on payday.
Here is how to automate the entire process:
- Set Up Direct Deposit Splitting: Ask your employer’s payroll department to split your direct deposit paycheck. Direct 90% of your net pay into your primary checking account for regular bills, and send the remaining 10% directly into your separate High-Yield Savings Account. If you never see the money in your spending account, you will never miss it.
- Align with Your Budget Framework: If you use the 50/30/20 budget framework, ensure your emergency fund contributions fall directly under your 20% savings and debt reduction category until your Tier 2 or Tier 3 milestone is met.
- Funnel Windfalls Directly: Accelerate your timeline by channeling non-recurring income—such as tax refunds, annual work bonuses, cashback rewards, or proceeds from selling unused household items—directly into your cash cushion.
Building an emergency fund is a gradual process, but every $100 you stash away buys another layer of financial peace. As you build out your foundation, explore our guides on
Starting an Emergency Fund from Scratch How to build a fund step by step and not get overwhelmed.
How to Make an Emergency Fund Last Through a Crisis How not to burn through your fund when the worst has happened.
Emergency Fund Mistakes to Avoid Keep your savings resilient through every stage of life.
📌 Your 3-Step Action Plan for Today
- 1. Calculate your Bare-Bones Survival Number by adding up your Core Four essentials (housing, utilities, groceries, transport) plus debt minimums.
- 2. Open a separate FDIC/NCUA-insured HYSA away from your daily checking account to eliminate spending temptation.
- 3. Schedule an automated transfer of $25 to $50 for your next payday to build momentum toward your Tier 1 ($1,000) starter buffer.
TalkBudget provides general educational content and is not a registered financial advisor or CPA. Please consult a qualified professional before making major financial decisions.
The Pay-Yourself-First Budget: Stop Living Paycheck to Paycheck
The pay yourself first budget (budget backwards).
If you feel like your paycheck vanishes the second it hits your checking account, you do not have a willpower problem—you have a system friction problem. Most budgeting advice fails because it demands robotic perfection: tracking every pack of gum, cutting out all joy, and pretending annual bills like car insurance or holiday gifts don’t exist until they wipe out your checking balance.
A realistic budget is not a financial crash diet. It is an automated cash-flow pipeline designed to protect your essentials, fund your future, and give you 100% guilt-free permission to spend whatever is left. In this guide, we are hitting the reset button with a four-phase practical system: cutting silent leaks, smoothing out irregular bills with sinking funds, establishing an unshakeable weekly allowance, and running a 15-minute payday protocol that puts your finances on auto-pilot.
Phase 1: Plug Silent Leaks with the “Cut, Trim, Keep” Audit
Before reallocating your money, you need to stop unintentional drainage. Between micro-subscriptions, creeping cell phone add-ons, and recurring streaming platforms you haven’t opened in months, the average household loses $150 to $300 every month without realizing it.
Instead of slashing everything and making yourself miserable, run your last 30 days of bank and credit card charges through our Cut, Trim, Keep Decision Matrix:
⚠️ Beware: The “Ghost Subscription” Trap
Watch out for third-party billing through Apple App Store, Google Play, or PayPal. Often, deleting an app off your home screen does not stop the monthly subscription charge. Log into your device’s subscription manager to confirm cancellations are actively finalized.
Next Step: Log into your primary checking account, scroll through your past 30 days of transactions, and flag every recurring debit into Cut, Trim, or Keep.
Phase 2: Eliminate “Surprise Bills” with Non-Monthly Sinking Funds
Here is an uncomfortable truth: unexpected car repairs, veterinarian visits, annual Amazon renewals, and holiday gifts are not emergencies. They happen every single year. Yet when we don’t prepare for them, we treat them like financial crises—charging them to high-interest credit cards or raiding savings.
If you’ve already walked through our baseline guide on How to Start Budgeting, you know that irregular bills are the number one reason beginners give up. The antidote is a sinking fund: a dedicated savings bucket where you set aside small, regular amounts each pay period so cash is already waiting when the bill comes due.
The Non-Monthly Sinking Fund Cheat Sheet
Use this breakdown to convert your most common irregular expenses into manageable monthly or per-check deposits:
⚠️ Beware: Don’t Commingle with Your Emergency Fund!
Your emergency fund is reserved strictly for catastrophic, unpredictable events (job loss, sudden emergency room visits, immediate home damage). Sinking funds are for known upcoming bills. Dipping into your emergency fund to pay for Amazon Prime or routine brake pads slowly erodes your genuine safety net.
💡 Advice & Pro-Tip: Use High-Yield “Buckets”
Keep your sinking funds physically isolated from your daily checking account. Open an FDIC-insured High-Yield Savings Account (HYSA) with online banks that allow sub-savings accounts or digital vaults (such as Ally Bank, Capital One 360, or SoFi). You will earn safe, competitive interest while keeping your car repair stash from accidentally being spent on weekend takeout.
Next Step: Choose the single largest non-monthly expense that wrecked your budget last year (for most drivers, it’s auto insurance), divide that total by 12, and schedule an automatic transfer to your HYSA for that exact amount every month.
Phase 3: The “Weekly Cash Allowance” Formula
A classic mistake beginners make is managing discretionary lifestyle spending on a 30-day timeline. When you see $600 sitting in your checking account labeled “groceries and dining out” on the 3rd of the month, your brain perceives wealth. You treat yourself to fancy dinners and extra supermarket trips—only to find yourself scrambling on the 22nd with $38 left to stretch across eight days.
The solution is shifting to a Weekly Safe-to-Spend Allowance. Whether you prefer the broad split of The 50/30/20 Budget or the physical friction of Envelope Budgeting, translating your leftover money into a weekly figure simplifies your daily decisions.
The Safe-to-Spend Formula
Weekly Allowance = [Net Monthly Take-Home – (Fixed Bills + Sinking Funds + Base Savings)] ÷ 4.33
Non math people translation: add your fixed bills to your sinking funds allocation, then add your base savings. Take this total away from your net monthly takehome and finally divide this total by 4.33.
*Note: We divide by 4.33 because months have an average of 4.33 weeks, preventing end-of-month cash shortages.
Real-World Case Study: Marcus (W-2 Employee)
- Net Monthly Take-Home Pay: $4,200
- Fixed Essentials (Rent, utilities, transit, loan minimums): -$2,500
- Sinking Funds (Car care, annual insurance, gifts): -$300
- Emergency HYSA / Roth IRA Transfer: -$400
- Total Available for Variable Spending: $1,000
Marcus’s Weekly Allowance: $1,000 ÷ 4.33 = $230.95 / week
🎉 The Psychological Win: Weekly Resets
If Marcus splurges on a nice Saturday steakhouse and blows his $230 budget by Sunday afternoon, he doesn’t destroy his entire month. He simply tightens his belt for 48 hours until his allowance resets clean on Monday morning. Your financial failures are capped at 7 days instead of snowballing into 30.
Next Step: Run your numbers through the formula above. Set up a secondary free checking account or grab a separate debit card, and transfer just your weekly allowance amount onto that card every Monday morning.
Phase 4: The 15-Minute “Payday Routine Checklist”
Do not wait until the weekend to decide what to do with your paycheck. The longer unallocated money sits idle in your primary checking account, the faster it dissolves into lifestyle creep.
Fans of Zero-Based Budgeting assign every dollar a job right down to zero. You don’t have to spend hours on spreadsheets to get the same benefits. Instead, open your banking app on payday morning and run this 4-step sequence:
ℹ️ Banking Pro-Tip: Split Direct Deposit at Payroll
Want to make this even faster? Most employer payroll systems (like ADP, Gusto, or Workday) allow you to split your direct deposit across multiple bank accounts. You can configure your paycheck to automatically send 15% straight to your HYSA, with only the bill-paying portion landing in your primary checking account.
For more strategies on preserving these routines when life gets hectic, read our guide on Sticking to a Budget Through Habit Maintenance.
Next Step: Set a recurring calendar reminder for 8:00 AM on your upcoming payday titled: “15-Minute Budget Reset.”
📌 Your Paycheck Reset Checklist
- Run the Cut, Trim, Keep audit: Identify and eliminate at least two phantom subscriptions before the weekend.
- Open a sub-savings bucket: Pick your highest recurring annual bill and set up an automatic monthly transfer in an HYSA.
- Calculate your weekly allowance: Take your net pay, deduct bills and savings, divide by 4.33, and cap your daily spending to that number.
- Run the 15-minute payday checklist: Move your money the morning you get paid before bad spending habits have a chance to take over.
Achieving lasting financial stability isn’t about cutting out every cup of coffee or living in complete deprivation. When you build clear guardrails, plan for the unexpected, and automate where your money flows, stress melts away—leaving you in complete control of your wealth.
TalkBudget provides general educational content and is not a registered financial advisor or CPA. Please consult a qualified professional before making major financial decisions.