
Jim Grainge
Zero Based Budgeting
Zero-based budgeting is a financial system where your income minus your total outgo (expenses, debt payoff, and savings) equals exactly zero: Income – Outgo = $0.00.
Instead of letting whatever is left at the end of the month slip through the cracks, you assign every single dollar a clear, dedicated assignment before the billing cycle even begins.
The most common fear beginners have is that a “zero budget” means draining your checking account down to $0.00 and flirting with overdraft fees. It does not. A zero-based budget is an accounting allocation on paper—not a reckless run on your bank account. By deliberately naming where every dollar goes before it leaves your hands, you eliminate the mystery of the missing paycheck, protect against lifestyle creep, and build measurable wealth on purpose.
ℹ️ The Core Principle:
Every single dollar that enters your household has a pre-assigned job: fixed bills, daily living, debt payoff, or future savings. Nothing sits idle waiting to be spent on impulse.
Zero-Based Budgeting vs. The 50/30/20 Rule
If you have explored our guide on how to start budgeting, you know there is no single “right” way to manage cash flow. Choosing between a broad percentage framework like the 50/30/20 rule and the tactical discipline of zero-based budgeting depends on your personal financial goals and how much hands-on control you need.
The 50/30/20 rule functions as a broad compass: 50% of net pay covers essentials, 30% goes to lifestyle wants, and 20% funds savings or extra debt payments. It is an approachable model for beginners who want simple guardrails without tracking line items. However, as noted when testing popular budgeting methods for 90 days, percentage models often fail people carrying high-interest credit card debt or households with tight cash margins. Ten or fifteen percent of discretionary income easily leaks out unnoticed.
Zero-based budgeting trades casual estimations for absolute control. It turns your finances into a deliberate roadmap where every dollar must pull its weight.
Actionable Takeaway: If you are comfortable with your savings rate and carry zero revolving consumer debt, a percentage model works well. If you are actively paying down debt or constantly wondering where your paycheck vanished, commit to zero-based budgeting for at least 90 days.
Read more on the 50/30/20 budgeting method here!
The 5-Step Blueprint to Building Your Zero-Based Budget
Setting up a zero-based plan does not require complex accounting software. Follow this sequential blueprint to assign every dollar before the upcoming month starts.
Step 1: Calculate Your Real Net Take-Home Pay
Never budget off your gross annual salary. Taxes, mandatory FICA withholdings (Social Security and Medicare), health insurance premiums, and pre-tax retirement contributions like a Traditional 401(k) or 403(b) are deducted before money reaches your hands. Your budget starts strictly with your net take-home pay—the actual direct deposits that hit your checking account each month.
Step 2: Fund the “Core Four” Non-Negotiables First
Before allocating funds for streaming platforms or dining out, cover your essential survival expenses. These four obligations protect your ability to work and live safely:
- Shelter: Rent or mortgage payments, property taxes, and HOA dues.
- Utilities: Electricity, water, natural gas, heating fuel, and essential internet access.
- Basic Food: Nutritious home groceries (excluding takeout and restaurant spending).
- Transportation: Auto loan minimums, vehicle insurance, gas, or public transit passes.
Step 3: Group Variable Expenses into “Macro-Buckets”
The primary reason people abandon zero-based budgeting is tracking burnout. If you create 35 individual line items for coffee, pet treats, dry cleaning, and cosmetics, you will tire of tracking them within three weeks. Group variable expenses into 6 to 8 broad “macro-buckets” such as Groceries & Household Goods, Dining & Entertainment, and Personal Care. Assign a fixed dollar limit to each bucket, track against that single total, and allow yourself flexibility within the category.
Step 4: Tame Irregular Bills with Sinking Funds
Annual, semi-annual, or seasonal expenses are not real emergencies; they are predictable obligations without a fixed monthly invoice. Sinking funds prevent these costs from sabotaging your plan. Take the total expected expense, divide it by 12, and allocate that amount each month into an FDIC-insured High-Yield Savings Account (HYSA):
- Auto Registration & Inspection: $240/year = $20 per month.
- Holiday Gifts & Entertaining: $600/year = $50 per month.
- Annual Subscriptions / Memberships: $180/year = $15 per month.
- Home/Car Maintenance Reserve: $1,200/year = $100 per month.
Step 5: Direct the “Last Dollar” Using the Priority Ladder
After covering essentials, macro-buckets, and sinking funds, you will likely have cash remaining. In a traditional budget, this money casually disappears on impulse buys. In a zero-based plan, every remaining dollar is assigned following a structured priority ladder:
- Establish a $500 Checking Cushion (to prevent overdraft fees).
- Build a $1,000 Starter Emergency Fund in an HYSA.
- Eliminate Toxic Debt (pay off credit cards with 20%+ APR using the debt avalanche or debt snowball method).
- Fund 3 to 6 Months of Living Expenses in a dedicated emergency fund.
- Invest for Long-Term Wealth (maximize your employer 401(k) match, fund a Roth IRA, or contribute to a Health Savings Account).
💡 Advice & Pro-Tip:
Automate your priority goals. Schedule transfers to your HYSA or Roth IRA for the day right after your paycheck lands. When the allocation happens automatically, you remove the temptation to spend those dollars elsewhere.
Actionable Takeaway: Write out your fixed expenses and Core Four obligations today. Subtract them from your monthly net income to identify your true remaining discretionary balance.
The Safety Valve: Building Your Checking Account Cushion
The single greatest operational mistake in zero-based budgeting is confusing your budget sheet with your actual bank balance. If your spreadsheet balance reaches $0.00 and your checking account drops to $0.00 simultaneously, an unexpected pending charge or poorly timed utility bill can trigger automatic non-sufficient funds (NSF) penalties or bank overdraft fees.
⚠️ Beware: Overdraft and NSF Traps
According to data monitored by the Consumer Financial Protection Bureau (CFPB), standard overdraft and non-sufficient fund fees can range up to $35 per occurrence. Multiple small transactions clearing against a depleted balance can quickly spiral into hundreds of dollars in automated penalties.
To insulate yourself, establish a permanent $250 to $500 Checking Account Cushion. Treat this money as an untouchable operational firewall. On your budget sheet, this cash does not exist—it has already been “spent” into the baseline balance of the account. If a utility bill processes two days earlier than expected or an automated toll payment posts, this cushion absorbs the impact smoothly without triggering bank alerts or penalties.
Actionable Takeaway: Before making aggressive extra payments toward credit card debt or long-term investments, allocate your first spare $300 to $500 directly to your checking account as a permanent cash buffer.
Real-World Model: A Complete $4,500/Month Zero-Based Budget
To see how this framework functions in practice, review this balanced monthly budget for a typical US household with a net take-home pay of $4,500 deposited across the month.
Actionable Takeaway: Open a blank spreadsheet or notebook and model your own real numbers against this table. If your bottom line shows a positive number, increase your debt payoff or savings line item until the remaining unassigned balance hits exactly $0.00.
How to Overcome the 3 Biggest Roadblocks in Zero-Based Budgeting
Zero-based budgeting is effective, but real life rarely aligns perfectly with a spreadsheet on day one. Here is how to navigate the three most common hurdles without abandoning your plan.
Roadblock 1: The Mid-Month Overspend (“The Rule of the Pivot”)
You budgeted $550 for groceries, but unexpected dinner hosting pushed your grocery spend to $620 by the third week. In traditional budgeting, people often assume the budget is ruined and revert to uncontrolled spending. With zero-based budgeting, you simply apply the Rule of the Pivot: every overspend must be balanced by an equal reduction in another category.
If you overspend by $70 on groceries, transfer $70 out of your dining-out or personal entertainment bucket to offset the difference. Your budget balance stays at $0.00, your savings deposits remain intact, and you avoid creating new debt. For more strategies on preserving consistency when unexpected expenses strike, read our guide on sticking to a budget.
Roadblock 2: Budgeting on Irregular, Freelance, or 1099 Income
If you work on commission, freelance, or run a small business, your monthly deposits fluctuate. You cannot build an accurate zero-based budget using an unpredictable earnings guess. Instead, implement the Baseline + Holding Account strategy:
- Determine your baseline floor: Review your last 12 months and identify your lowest-earning month (e.g., $3,200). Build your primary zero-based budget around that conservative floor.
- Establish a “holding” savings account: When you experience a strong month and earn $5,000, fund your $3,200 baseline budget first. Transfer the remaining $1,800 surplus directly into your holding account.
- Supplement lean months: During slower periods, draw from your holding account to bring your operational budget up to the baseline $3,200 level.
Roadblock 3: The Payday Timing Gap
Many Americans are paid on a bi-weekly schedule (every other Friday), which results in 26 paychecks across the year. Bills, however, follow a monthly schedule. If your rent is due on the 1st, funding it out of a paycheck received on the 28th is easy—but handling it when your second paycheck does not clear until the 5th creates a timing problem.
The solution is the Half-Split Strategy. If your housing costs $1,400 per month, reserve $700 from your first paycheck into a dedicated holding sub-account or line item, then combine it with $700 from your second paycheck. When the 1st arrives, your full payment is ready without cash-flow stress.
✅ The 90-Day Learning Curve:
Expect your first two months of zero-based budgeting to require adjustments. You will underestimate categories and overlook small expenses. By month three, your category estimates will normalize and the process will take less than 20 minutes a week.
Actionable Takeaway: When a category runs over budget this week, do not abandon the system. Adjust another discretionary category immediately to keep your monthly sheet balanced at zero.
📌 Your Zero-Based Setup Checklist
- Document Net Pay: Base your plan strictly on real take-home deposits, not your gross salary.
- Cover Essentials First: Prioritize housing, utilities, basic groceries, and transit before discretionary wants.
- Maintain a $500 Checking Cushion: Keep an untouchable cash buffer to safeguard against overdrafts and processing delays.
- Plan for Non-Monthly Bills: Set up monthly sinking fund contributions for car maintenance, gifts, and recurring annual fees.
- Assign the Last Dollar: Channel leftover funds toward high-interest debt or an FDIC-insured emergency fund until your remaining unassigned balance hits exactly $0.00.
TalkBudget provides general educational content and is not a registered financial advisor or CPA. Please consult a qualified professional before making major financial decisions.
Envelope Budgeting in the Cashless Age
Envelope budgeting is an intentional spending system where your monthly income is divided into strict, category-specific “buckets” before the month begins. The principle is simple: once a bucket is empty, spending in that category stops completely until you get paid again. Historically, this meant withdrawing stacks of paper bills, stuffing them into labeled paper envelopes, and watching the cash dwindle with every purchase.
That classic method worked brilliantly for decades because handing over physical dollar bills triggered immediate psychological friction. But in today’s economy, running your entire financial life on paper cash is practically impossible. Landlords demand online rent portals, power utilities penalize manual payments, e-commerce dominates household shopping, and carrying hundreds of dollars in your pocket creates unnecessary safety risks. Worse, paper cash sitting on your dresser earns 0% interest while FDIC-insured High-Yield Savings Accounts (HYSAs) pay competitive returns.
You do not need paper cash to reap the discipline of an envelope budget. By rebuilding the system using modern banking architecture, digital sub-accounts, and automated guardrails, you can create the exact same psychological spending boundaries—without ever stepping foot inside a bank branch.
ℹ️ The Cashless Envelope Principle
A cashless envelope budget replaces paper money with segregated digital pools—either through separate checking accounts or smart budgeting apps. Your fixed essentials remain automated online, while your high-risk variable spending is locked behind strict digital limits that cannot overflow into your bill money.
Why Swiping Broke Our Spending Psychology
Credit card swipes, debit card taps, and Apple Pay checkouts have severed the emotional connection between buying something and watching resources vanish. When you hand a cashier a paper $50 bill, your brain registers loss. When you tap a plastic card or your phone against a terminal, the physical action is identical whether you are buying a $3 drip coffee or a $900 smartphone.
This “frictionless spending” is why millions of hard-working earners find themselves short on cash long before payday. If all your income sits in a single, all-in-one checking account, your brain looks at the lump-sum balance—say, $2,400—and falsely assumes you have plenty of room to splurge. You forget that $1,500 of that balance is already spoken for by rent, auto insurance, and the electric bill due next Thursday.
To fix this, we need to artificially inject friction back into our digital transactions. As we established in our guide on how to start budgeting, sustainable money management begins by separating non-negotiable fixed bills from variable lifestyle leaks. Digital envelope budgeting provides the ironclad fence between the two.
Section Takeaway: Mixing bill money and lifestyle money in one checking account creates spending illusions. Restoring financial control requires separating your funds into distinct digital accounts before you spend a single dollar.
Cashless Framework 1: The Multi-Account Bank Blueprint (100% Free)
The simplest, most cost-effective way to run a cashless envelope system is by setting up a multi-account banking structure. You do not need to download paid software or subscribe to a third-party service; you only need a quality, fee-free bank or credit union that allows multiple checking and savings accounts under one login.
This framework organizes your money into three distinct structural accounts:
- Account 1: The Fixed Bill Fortress (Primary Checking): Your paycheck deposits directly into this account. All fixed, non-negotiable living expenses (rent/mortgage, utilities, car note, insurance, internet, minimum debt payments) are automatically deducted from here. Crucial rule: You do not carry the debit card for this account in your wallet, nor do you link it to Apple Pay or Amazon.
- Account 2: The Variable Envelope (Secondary Checking): This is your day-to-day spending card. Every payday, an automated transfer moves a fixed allowance from Account 1 into Account 2. This card covers groceries, dining out, gas, and personal shopping. When this balance reaches zero, discretionary spending stops until the next transfer.
- Account 3: Sinking Funds & Emergency Buffer (High-Yield Savings): This account houses money for non-monthly bills (car registrations, holiday travel, annual subscriptions, medical co-pays) plus your starter emergency fund. Many modern online banks (such as Ally, Capital One 360, or SoFi) allow you to create digital “buckets” or “vaults” inside a single HYSA to track these goals individually while earning full interest.
Section Takeaway: You do not need twenty paper envelopes. Splitting your direct deposits between two checking accounts (Bills vs. Daily Life) and an HYSA provides instant, zero-maintenance digital boundaries.
Cashless Framework 2: Dedicated Digital Envelope Apps & Smart Cards
If you love granular control—meaning you want distinct digital envelopes for groceries versus coffee runs versus personal clothing—a basic two-checking-account setup might feel too broad. For higher category precision, two primary digital alternatives excel:
1. Virtual Zero-Based Budgeting Apps
Platforms like YNAB (You Need A Budget) and Goodbudget operate on the pure digital envelope methodology. Your money remains in your standard checking and savings accounts, but the software creates a digital layer over your balances. Every dollar from your paycheck is assigned to a specific digital envelope. When you spend money on your normal debit or credit card, the app immediately subtracts the transaction from that designated category.
2. Smart “Enveloping” Debit Cards
FinTech banking platforms like Qube Money take digital envelopes one step further by introducing hard physical restrictions. Your balance sits in separate digital “qubes” (envelopes) inside a mobile app. Your physical debit card has an available balance of exactly $0. Before buying groceries or ordering dinner, you open the app, tap your “Dining” or “Groceries” qube, and the card temporarily unlocks for that exact sum. Once the transaction clears, the card locks back to zero. This completely prevents impulse overspending at checkout counters.
💡 Advice: Free Banking vs. Paid Apps
If you are actively paying off high-interest credit card debt, do not pay for subscription budgeting software. Start with the free Multi-Account Bank Blueprint first. Only upgrade to paid envelope software if you find that a broad variable checking account still leaves you overspending on specific micro-categories.
Section Takeaway: If multi-account banking feels too loose, smart debit cards and zero-based tracking apps deliver surgical category control right on your smartphone.
How to Set Up Your Cashless Envelopes in 4 Steps
Step 1: Isolate the “Leakage Categories” Only
The single biggest mistake beginners make with envelope budgeting is trying to turn every single expense into an envelope. You do not need a digital envelope for your electric bill, your car payment, or Netflix. Those bills are predictable and belong on autopay inside your Fixed Bill Fortress.
Envelopes are strictly reserved for variable, behavior-driven spending categories where cash leaks out. For 90% of households, that comes down to four buckets:
- Groceries & Household Essentials: Supermarket runs, cleaning supplies, toiletries.
- Dining Out & Work Lunches: Restaurants, takeout, food delivery apps, morning coffee.
- Everyday Discretionary: Clothing, hobby items, home decor, spontaneous Amazon purchases.
- Entertainment & Social: Weekend drinks, concert tickets, sporting events, outings with friends.
Step 2: Calculate Weekly Funding (The “Burn Rate”)
Monthly spending allowances often lead to budgeting burnout. If you allocate $600 a month to groceries inside your digital envelope, having $600 on day two creates a psychological cushion that encourages overspending. By day twenty, you are down to $22 and forced to scrounge through the pantry.
Instead, divide your variable envelope targets by the number of weeks in the month ($600 / 4 = $150 per week). Schedule automated weekly transfers from your Bill Checking account into your Variable Spending account every Monday morning. Resetting your boundary on a 7-day cycle keeps your burn rate manageable and eliminates month-end panics.
Step 3: Automate Payday Dispersals
Friction works both ways. While we want friction when spending money, we want zero friction when organizing it. Set up automatic recurring transfers through your bank’s online portal to fire off the business day after your direct deposit hits:
- Transfer your calculated monthly savings/debt snowball directly to your HYSA.
- Transfer your calculated weekly or bi-weekly spending allowance into your Variable Spending account.
- Leave the remaining balance untouched in your primary checking account to feed automated bill pay.
Step 4: Establish the “Empty Envelope Protocol”
What happens when your dining out envelope hits zero by Thursday night and your friends invite you out for dinner? This is the crossroads where traditional budgets collapse. To succeed, you must practice the Empty Envelope Protocol.
⚠️ The Iron Rule of the Empty Envelope Protocol
If an envelope runs dry mid-cycle, you are allowed to move money from another discretionary bucket (e.g., pulling $40 from your clothing or entertainment envelope to fund dinner). However, you must never transfer money from your Fixed Bills account or your Emergency Savings. Forcing yourself to sacrifice another fun category preserves the integrity of your overall budget.
If you find yourself constantly wanting to abandon your limits mid-month, review our battle-tested guide on sticking to a budget to build better spending endurance.
Section Takeaway: Keep your envelopes limited to 3–4 leakage categories, fund them on a weekly or bi-weekly cadence rather than monthly, and never raid bill money to cover lifestyle shortfalls.
The 30-Day Transition Phase & Calibration
Your first month on a cashless envelope system will not be flawless. You might underestimate how much you spend on groceries or realize that your fuel costs spike every third week. That is completely normal. A budget is not a static stone tablet; it is a flexible framework that requires initial tuning.
Commit to a 10-Minute Sunday Calibration for the first four weeks:
- Log into your bank app or digital budgeting tool.
- Check the balances remaining in your variable spending pools.
- Adjust your weekly transfer numbers if you notice you consistently starved one category while over-funding another.
In our field review where we tested every popular budgeting method for 90 days, the systems that survived long-term were the ones that allowed for realistic human friction rather than perfection. Give your digital envelopes at least two full pay cycles before making massive structural overhauls.
Section Takeaway: Treat month one as a laboratory. Conduct a weekly 10-minute check-in to adjust your category targets based on real-world spending data.
📌 The Cashless Envelope Launch Checklist
- Designate Your Accounts: Keep your existing checking for fixed bills and open a secondary, fee-free checking account exclusively for daily lifestyle spending.
- Isolate Your Leakage Categories: Pick your top 3–4 trouble spots (groceries, dining, entertainment, shopping).
- Calculate Your Weekly Burn Rate: Divide your monthly variable total by 4 so you only manage one week’s cash at a time.
- Automate Payday Transfers: Schedule direct transfers from your Bill Checking into your Variable Spending card to run automatically every payday.
- Enforce the Friction: Keep the Bill Fortress debit card out of your everyday wallet and out of your digital mobile wallets.
Disclaimer: TalkBudget provides general educational content and is not a registered financial advisor or CPA. Please consult a qualified professional before making major financial decisions.
The 50/30/20 Budget: A Beginner’s Guide to Stress-Free Money Management
The 50/30/20 Budget: A Beginner’s Guide to Stress-Free Money Management
The 50/30/20 budget is a proportional spending framework that divides your monthly after-tax income into three distinct categories: 50% for essential Needs, 30% for discretionary Wants, and 20% for Savings and extra debt payoff. Rather than forcing you to log every $4 coffee or maintain twenty separate spreadsheet tabs, it sets up broad, sustainable financial guardrails that balance today’s lifestyle with tomorrow’s wealth.
Originally popularized by bankruptcy expert and U.S. Senator Elizabeth Warren in her book All Your Worth, this system was created to solve a common financial dilemma: how to build long-term security without living like an ascetic monk. When we put the most popular financial tracking systems to the test in our 90-day budgeting experiment, the 50/30/20 rule consistently scored the highest marks for real-world adherence. It works because it doesn’t eliminate fun—it budgets for it.
ℹ️ The 50/30/20 Rule at a Glance
50% Needs: Non-negotiable survival expenses (rent/mortgage, utilities, basic groceries, transit, minimum debt payments).
30% Wants: Discretionary lifestyle choices (dining out, streaming apps, concerts, vacations, hobbies).
20% Savings & Debt: Building wealth and crushing liabilities (emergency fund in an HYSA, Roth IRA, extra credit card principal).
Step 1: Calculate Your Real Starting Number (The Net Pay Rule)
The single fastest way to break a 50/30/20 budget before you even begin is budgeting with your gross salary. If your offer letter states an annual salary of $60,000, your gross monthly earnings are $5,000. However, after federal, state, and local income taxes, plus mandatory FICA contributions (6.2% Social Security and 1.45% Medicare), your actual bank deposit is significantly less. If you have not audited your bank accounts recently, review our foundation guide on how to start budgeting to pull your trailing 60-day cash flow data.
Your baseline for the 50/30/20 calculation must always be your net take-home pay—the actual dollar figure deposited into your checking account.
How to Handle Pre-Tax Deductions (401(k), HSA, and Health Insurance)
Many workplace benefits bypass your checking account entirely. Here is how to factor them into your 50/30/20 math without muddying the waters:
- Pre-Tax Healthcare Premiums: Treat employer-sponsored health, dental, and vision insurance as a baseline deduction that is already handled. Calculate your percentages using the net pay that arrives after these deductions.
- Retirement Contributions (Traditional 401(k) or 403(b)): If your employer automatically deducts 5% from your gross paycheck for your retirement match, congratulations—you are already funding a quarter of your 20% savings target. You only need to allocate an additional 15% from your net take-home pay toward other savings priorities (such as a Roth IRA or an emergency fund) to hit the 20% mark.
- Health Savings Accounts (HSA) / Flexible Spending Accounts (FSA): If you contribute pre-tax dollars to an HSA, count this deduction toward your 20% savings bucket if you are investing it for the long term, or leave it outside your net take-home math if it is spent immediately on ongoing medical needs.
Aligning With Your Pay Schedule
- Bi-Weekly (Every 2 Weeks): You receive 26 paychecks per year. Ten months contain two paychecks, while two months contain three. Base your monthly budget around two paychecks (totaling 24 paychecks annually). Treat the two “bonus” paychecks as instant accelerants for your 20% savings or debt targets.
- Semi-Monthly (1st & 15th): You receive 24 paychecks per year. Your cash flow is completely predictable; combine both paychecks to set your monthly baseline.
- Weekly (Every Week): Multiply your average net weekly check by 4.33 to identify your true monthly baseline.
Your Actionable Next Step: Log into your primary payroll portal or check your latest paystubs. Identify your exact monthly net take-home total and multiply it by 0.50, 0.30, and 0.20 to reveal your personalized targets.
Step 2: The Three Buckets Explained (And How to Solve Gray Areas)
The beauty of the 50/30/20 rule lies in its clean division of funds. However, real life rarely presents expenses in neat packages. Let’s break down each bucket and eliminate categorization confusion.
Bucket 1: 50% Needs (Your Non-Negotiables)
Needs are expenses required to keep a roof over your head, food on the table, clothes on your back, electricity running, and your employment active. If you lost your job tomorrow, these are the bills you would still have to pay to survive:
- Housing: Rent, mortgage payments, HOA fees, and property taxes.
- Core Utilities: Water, electric, gas/heating, trash collection, and basic home internet.
- Groceries: Baseline food and essential household cleaning/hygiene products.
- Transportation: Essential car payments, basic auto insurance, commuter fuel, routine maintenance, or public transit passes.
- Minimum Debt Payments: The bare minimum payments on student loans, auto loans, and credit cards required to protect your FICO score.
Bucket 2: 30% Wants (Guilt-Free Discretionary Spending)
Wants represent all spending that enhances your lifestyle but is not strictly necessary for survival. This bucket gives you permission to enjoy your hard-earned money today without feeling an ounce of buyer’s remorse:
- Dining out, DoorDash/UberEats, coffee runs, and social drinks.
- Entertainment subscriptions: Netflix, Spotify, gaming passes, and concert tickets.
- Discretionary travel: Weekend road trips, airline flights, and hotel stays.
- Fitness and personal care: Boutique gym memberships, salon treatments, and designer clothing.
Bucket 3: 20% Savings & Accelerated Debt Payoff (Future Freedom)
This category is dedicated exclusively to improving your net worth and insulating you from economic shocks:
- Emergency Fund: Building a cash reserve of 3 to 6 months of living expenses stored safely in an FDIC-insured High-Yield Savings Account (HYSA).
- Retirement Accounts: Funding accounts beyond an employer match, such as a Roth IRA or Traditional IRA.
- Accelerated Debt Payoff: Any payment made above the minimum required balance on high-interest consumer debt (credit cards, personal loans) to wipe out balances faster.
⚠️ The Minimum Debt Payment Trap
Do not classify your entire credit card payment under Savings/Debt. Your minimum monthly payment belongs in the 50% Needs bucket because failing to pay it results in penalty fees and wrecks your credit profile. Only the extra principal you send above the minimum to eliminate the balance belongs in your 20% Savings & Debt bucket.
The “Survival vs. Choice” Litmus Test for Gray Areas
Struggling to decide whether an expense is a Need or a Want? Run the line item through these three simple questions:
- What happens if I stop paying this tomorrow? (If the answer is eviction, utility shut-off, or repossession, it is a Need. If the answer is boredom or minor inconvenience, it is a Want.)
- Is this the baseline version or an upgraded lifestyle choice? (A $60 unlimited smartphone plan is a Need; financing the latest $1,200 flagship device is a Want.)
- Can I substitute this for free or significantly cheaper? (Store-brand chicken and rice is a Need; ordering artisan takeout through a delivery app is a Want.)
Actionable Next Step: Review your last month’s debit and credit card statements. Flag any gray-area subscriptions or food delivery orders that you previously labeled as “essentials” and reassign them to your 30% Wants bucket.
Step 3: What If 50% Isn’t Realistic? (The High-Cost-of-Living Fix)
If you live in a High Cost of Living (HCOL) market like New York, Los Angeles, Seattle, or Boston, you might look at the 50% Needs benchmark and laugh. In many metropolitan centers, rent or mortgage payments alone can consume 40% or more of an individual’s take-home pay.
When beginners discover their essential needs hit 65% of their income, they often assume budgeting is useless and quit. Do not abandon the process. The 50/30/20 formula is a target ideal, not a moral test. When local costs squeeze your baseline, adopt a calibrated Flex Ratio.
💡 Advice & Pro-Tip: The Transitional “Flex Ratios”
The 60/20/20 Split (The HCOL Compromise): Keep your 20% savings habit intact, but shift 10% from Wants to Needs. You live on 60% Needs, 20% Wants, and 20% Savings.
The 70/20/10 Split (The Debt Triage Mode): When living on an entry-level wage or tackling serious consumer balances, temporarily drop savings to a modest 10% while allowing Needs to take 70% and keeping Wants capped at 20%.
The golden rule of running a modified ratio is simple: never let your Wants expand beyond 30%. If your Needs require 60%, the extra 10% must come out of your lifestyle spending—not your emergency savings or retirement accounts.
Actionable Next Step: If your essential bills currently exceed 50%, calculate your exact current Needs percentage today. Choose whether a 60/20/20 or 70/20/10 split will serve as your temporary baseline for the next six months.
Step 4: Putting 50/30/20 on Autopilot
Budgeting fails when it requires constant willpower. If your entire paycheck sits in a single checking account connected to a debit card in your pocket, you will spend money meant for rent or savings on dining out and Amazon purchases.
The solution is an automated multi-account architecture that segregates your money the moment it arrives:
- Account A: Fixed Bills Checking (50%): This is your primary hub where your paycheck lands. Keep exactly 50% here to cover housing, utilities, groceries, and debt minimums. Set all recurring bills to auto-pay out of this account.
- Account B: Guilt-Free Lifestyle Checking (30%): Link your everyday debit card to a completely separate checking account. Every payday, transfer your 30% Wants allocation here. When this balance reaches zero, discretionary spending pauses until next payday.
- Account C: Wealth & Resilience (20%): An off-site High-Yield Savings Account (HYSA) at an FDIC-insured institution (like Ally, Marcus, or Capital One) or an investment firm (like Fidelity or Vanguard). Automatic transfers move this 20% out of reach within 24 hours of payday.
Executing this system does not require hours of micromanagement. In fact, running this split should take less than ten minutes every time your direct deposit clears.
We dive deep into the exact tactical steps in our companion guide, the 3-Step Payday Routine Checklist—make sure to reference it to streamline your payday transfers.
If you encounter an unexpected expense or slide off track during a high-spending holiday month, do not abandon the system. Review our core framework on sticking to a budget to rebalance your categories without dipping into your core emergency reserves.
📌 The 50/30/20 Implementation Checklist
1. Calculate monthly net take-home pay based on actual deposited funds.
2. Set a hard 50% cap on non-negotiable living expenses (or adopt a 60/20/20 flex ratio).
3. Run questionable purchases through the “Survival vs. Choice” Litmus Test.
4. Automate 20% transfers to an HYSA or investment accounts within 24 hours of payday.
5. Spend your 30% Wants balance with zero guilt knowing your future is fully funded.
Three Expensive 50/30/20 Traps to Avoid
Even with a clear ratio, everyday financial traps can undermine your progress. Watch out for these three common pitfalls:
1. Lifestyle Inflation Disguised as “Needs”
As your income grows through promotions or job transitions, it is natural for expenses to creep upward. A common misstep is upgrading to a luxury apartment, signing a steep auto lease, or shopping exclusively at boutique grocery markets, and continuing to classify the entire bill as a “Need.” Keep your lifestyle enhancements in the 30% Wants bucket where they belong.
2. Ignoring Sinking Funds for Irregular Bills
Semi-annual auto insurance premiums, annual Amazon Prime renewals, personal property taxes, and holiday shopping do not occur every month, but they are not emergencies. If you do not account for them inside your 50% or 30% pools using monthly “sinking funds,” they will repeatedly blow up your 20% savings goals.
3. Leaving Savings in Your Checking Account
Proximity breeds spending. When your savings sit directly inside your primary checking account, your brain views that money as spendable float. Moving your 20% allocation to an external HYSA creates visual separation and positive friction, keeping your emergency reserves safe from impulsive card swipes.
🎯 The 1-Year Compound Win
On a modest $4,000 monthly take-home income, maintaining a 20% savings habit channels $800 every single month into your future. In just twelve months, you will have built a $9,600 cash cushion—enough to handle almost any car breakdown, medical deductible, or job transition completely debt-free.
Build Your Spending Plan Today
The 50/30/20 rule is not a financial straitjacket; it is an intentional roadmap that grants you permission to live your life today while systematically building independence for tomorrow. You do not need complex math, costly software, or hours of tedious bookkeeping to take control of your financial journey.
To make setup effortless, download our free TalkBudget Starter Spreadsheet Pack. It features pre-configured 50/30/20 calculation templates for both Google Sheets and Microsoft Excel. Simply enter your net pay, and your personalized targets populate automatically.
TalkBudget provides general educational content and is not a registered financial advisor or CPA. Please consult a qualified professional before making major financial decisions.
The 3-Step Payday Routine: A 10-Minute Checklist to Put Your Money on Autopilot
The 3-Step Payday Routine: A 10-Minute Checklist to Put Your Money on Autopilot
The 3-step payday routine is an automated cash-flow management system designed to allocate your paycheck within ten minutes of landing in your account: Step 1 locks down your essential living bills in a primary checking account, Step 2 automatically sweeps your savings and extra debt payments into an off-site High-Yield Savings Account (HYSA) or investment account, and Step 3 transfers your lifestyle allowance into a secondary checking account for guilt-free everyday spending.
Most Americans fall victim to “payday millionaire syndrome”—that brief window of euphoria on Friday morning when your bank balance looks abundant, leading to relaxed spending over the weekend, followed by three weeks of financial anxiety. The problem is not your income; it is keeping all your money in a single, mixed-use checking account where rent money, grocery cash, and dinner-out funds slosh together. If you already calculated your target spending percentages in our companion guide to the 50/30/20 budget, this 10-minute routine is the operational engine that puts that plan on complete autopilot.
ℹ️ The Payday Sweep Principle
Never rely on willpower to save what is “left over” at the end of the month. By immediately dividing your paycheck into dedicated structural accounts within 24 hours of deposit, you remove daily budgeting friction and eliminate accidental overspending before it starts.
The Foundation: The 3-Account Banking Architecture
Before running this routine on payday, you must establish an intentional banking setup. Managing all your finances through a single checking account forces you to perform mental gymnastics every time you tap your debit card. Instead, separate your money across three specific accounts, each with one defined job:
In our review of hands-on tracking systems in our 90-day budgeting experiment, multi-account separation dramatically outperformed spreadsheet tracking for long-term consistency. When your spending money is physically quarantined from your rent money, you never have to guess what is safe to spend.
Actionable Next Step: Open a secondary, fee-free checking account at your current bank or an online bank to serve as your dedicated lifestyle spending hub.
Step 1: Lock Down Your “Core Essentials” (Minutes 0 to 3)
The moment your paycheck clears, your first objective is securing your shelter, food, utilities, and credit standing. If you have not yet audited your recurring baseline expenses, follow our walkthrough on how to start budgeting to establish your net take-home pay and fixed obligations.
During these first three minutes, execute three quick actions:
- Verify the Direct Deposit: Log into Account 1 (Primary Checking) and confirm that your net deposit matches your paystub after federal, state, FICA, and pre-tax benefit deductions.
- Review the Upcoming Bill Cycle: Check which fixed bills come due before your next paycheck (e.g., rent on the 1st, electric on the 8th, auto insurance on the 12th).
- Retain Your Baseline Allocation: Leave the exact dollar amount required to cover these fixed essentials—typically 50% to 60% of your net pay—directly in Account 1.
⚠️ Beware: The “Autopay Overdraft Trap”
Automating your bills is the gold standard of personal finance, but setting autopay on an account that also handles daily debit swipes is a recipe for expensive overdraft fees. When you lock down Account 1 exclusively for fixed bills and lock the debit card away in a drawer, your recurring autopay schedules will clear predictably every billing cycle.
Your Actionable Next Step: Align the payment due dates for your major recurring utilities and subscriptions with the business days immediately following your direct deposit dates.
Step 2: Pay Your Future First (Minutes 4 to 6)
Once your fixed survival needs are ring-fenced in Account 1, your very next transfer must be to your future self. Most people wait until the end of the month to save whatever cash happens to remain. In reality, lifestyle spending expands to consume whatever balance is visible, leaving zero savings month after month.
During minutes 4 through 6, initiate an automatic transfer of your wealth allocation (typically 20% of net pay) out of Account 1 and distribute it down this clear priority waterfall:
- The $1,000 Starter Emergency Cushion: If you do not have at least $1,000 in liquid reserves, send 100% of your savings allocation to an FDIC-insured High-Yield Savings Account until this baseline buffer is funded.
- Accelerated High-Interest Debt Elimination: If you carry high-interest credit card debt or personal loans, direct all excess funds above your contractual minimum payments toward your highest APR balance (the debt avalanche) or smallest balance (the debt snowball).
- Fully Funded Emergency Fund: Expand your savings buffer to 3 to 6 months of essential living expenses in an HYSA earning a competitive yield.
- Sinking Funds for Irregular Bills: Transfer a calculated monthly share into dedicated sub-savings buckets for non-monthly expenses (semi-annual car insurance, holiday gifts, Amazon Prime renewals, personal property taxes).
- Retirement & Long-Term Wealth: Fund a Roth IRA or taxable brokerage account, keeping in mind any employer-matched 401(k) or 403(b) contributions already deducted on your paystub.
🎯 The Wealth Sweep Milestone
Consistently sweeping just $250 every bi-weekly payday into an HYSA or broad-market index fund builds a $6,500 annual foundation. Over five years, that simple 2-minute payday habit puts more than $35,000 in your corner, shielding you from predatory loans and financial shocks.
Actionable Next Step: Set up an automatic recurring transfer from your primary checking account to your external HYSA scheduled for the morning following your official payday.
Step 3: Fund Your Guilt-Free Lifestyle Hub (Minutes 7 to 10)
With your bills covered and your savings secured, you have earned complete permission to spend what is left. In minutes 7 through 10, transfer your remaining discretionary allowance (typically 30% of your net pay) from Account 1 into Account 3 (Secondary Checking).
This account is your personal playground. You do not need to track line-item receipts, record $5 iced coffees, or feel guilty about ordering sushi on a Tuesday night. Your rent is safe, your credit cards are being handled, and your investments are growing off-site.
The Built-In Behavioral Stop Sign
The genius of this secondary account is that it establishes hard, physical limits without psychological misery. If you burn through your lifestyle balance ten days into a two-week pay period, you do not need to rewrite a complex budget spreadsheet. You simply pause discretionary restaurant visits and entertainment until the next payday. Your essential survival, utilities, and emergency reserves remain untouched.
If an unexpected household emergency or seasonal expense threatens to spill over between paychecks, refer to our practical strategies on sticking to a budget to rebalance your funds without tapping long-term reserves.
💡 Advice & Pro-Tip: The Mobile Wallet Swap
To prevent accidental spending from your bills account, remove Account 1’s debit card from your smartphone wallet entirely. Set Account 3’s debit card as your exclusive default payment method on Apple Pay, Google Wallet, and food delivery apps.
Actionable Next Step: Initiate your first transfer to Account 3 and set an account balance push alert on your phone for when the account drops below $50.
The Master 10-Minute Payday Checklist
Keep this sequence handy every time your direct deposit lands. Run through it in order, confirm your transfers, and log off your banking dashboard.
📌 The 10-Minute Payday Action Checklist
⇒ Minute 0–2: Log in to Account 1. Verify that your net paycheck matches expectations.
⇒Minute 2–4: Check upcoming bills due before next payday. Retain baseline living costs (Needs) in Account 1.
⇒ Minute 4–6: Execute or verify automated sweep of your 20% allocation to your HYSA, extra debt principal, or Roth IRA.
⇒ Minute 6–8: Transfer your discretionary allowance (30% Wants) to Account 3 (Lifestyle Checking).
⇒ Minute 8–10: Confirm all scheduled auto-pays for the cycle are active. Log out and spend your lifestyle balance guilt-free.
Adapting the Routine for Different Pay Schedules
Your payday routine must align with how frequently cash enters your bank account. Here is how to calibrate the system across standard US payment schedules:
Your Actionable Next Step: Open your calendar and locate your pay dates for the upcoming quarter. If you are paid bi-weekly, highlight your two “magic” 3-paycheck months so you can plan for accelerated savings.
Take the Stress Out of Payday
Budgeting is not about spending hours categorizing receipts; it is about establishing automated systems that make smart financial decisions effortless. By dedicating ten minutes on payday to locking down essentials, sweeping savings off-site, and funding a guilt-free spending hub, you eliminate money stress and make consistent progress toward financial independence.
To jumpstart your routine, grab our free TalkBudget Starter Spreadsheet Pack. It includes automated cash-flow allocation sheets and paycheck-planning schedules designed to match your exact pay frequency.
TalkBudget provides general educational content and is not a registered financial advisor or CPA. Please consult a qualified professional before making major financial decisions.
Bare Bones Budget
Bare Bones Budget: How to Build an Emergency Survival Budget That Protects What Matters
A bare bones budget—often called a survival budget or emergency spending plan—is a stripped-down financial blueprint that covers only the absolute necessities required to keep a roof over your head, food on your table, and the utilities running. It temporarily eliminates all discretionary spending, entertainment subscriptions, dining out, and non-essential shopping to free up maximum cash when life throws a curveball.
Think of a bare bones budget not as a financial prison sentence, but as a tourniquet. You do not leave a tourniquet on your arm permanently; you apply it swiftly during an acute crisis to stop the bleeding, stabilize the situation, and buy yourself the precious time needed to heal. Whether you have just experienced a sudden job loss, faced an unexpected medical crisis, or simply decided to execute a 90-day blitz to demolish a stubborn credit card balance, this operational survival plan gives you complete control when everything else feels unstable.
In this guide, we will walk you through exactly how to calculate your baseline “survival number,” triage your bills when cash is running short, execute painless expense downgrades, and protect your mental health while living lean.
ℹ️ Definition & Operational Purpose:
A bare bones budget accounts strictly for survival-level obligations: shelter, basic nutrition, keeping the lights on, critical medicines, and necessary transportation. Discretionary wants, retail therapy, and lifestyle conveniences are paused entirely until financial stability is restored.
When to Deploy a Bare Bones Budget: Crisis vs. The Tactical Sprint
A survival budget is designed for two very specific scenarios: involuntary crises and intentional financial sprints. Understanding which camp you fall into dictates how aggressively you cut and how long you should remain in this ultra-lean posture.
1. The Involuntary Crisis (Defensive Mode)
When an unexpected economic blow lands, your immediate objective is preserving liquid cash. The faster you drop into a bare bones budget, the longer your existing cash reserves—or severance check—will last. Primary triggers include:
- Sudden Job Loss or Layoff: You need to stretch your final paycheck, severance package, and state unemployment benefits across an uncertain timeline.
- Significant Income Reduction: A cut in hourly shifts, loss of an independent contract, or a reduction in corporate commissions.
- Acute Medical Emergencies: Coping with an out-of-pocket maximum or lost wages while recovering from an illness or injury.
- Family Emergencies or Major Life Transitions: Unplanned travel for a family crisis, navigating legal separation or divorce, or dealing with an immediate home repair that insurance will not cover.
2. The Tactical Sprint (Offensive Mode)
A bare bones budget is not just for emergencies; it is also a powerful offensive weapon. If you are exhausted by high-interest consumer debt, you can willingly choose to live on bare bones for a predefined window—typically 60 to 90 days—to generate explosive progress.
During a tactical sprint, every single dollar shaved off your everyday life is redirected into building your starter emergency fund in a High-Yield Savings Account (HYSA) or wiping out toxic credit card balances. Because you know the sprint has an end date, the temporary restriction feels empowering rather than draining.
Next Step: Determine your stance before changing a single dollar. Write down on a sheet of paper whether you are entering Defensive Mode (preserving cash due to an income drop) or an Offensive Sprint (accelerating a specific financial target for a set duration).
The Three Tiers of Bare Bones Living
Not every emergency requires the same level of severity. Slashing your life to the bone when you merely have a small, temporary dip in freelance income can lead to unnecessary panic and burnout. At TalkBudget, we recommend categorizing your situation into one of three distinct operational tiers:
⚠️ Critical Distinction: Secured vs. Unsecured Debt in a Crisis:
If you enter Tier 3, never sacrifice food, rent, or electricity to pay an unsecured credit card bill. While missed payments hurt your FICO Score, unsecured creditors cannot seize your home or repossess your car without extensive legal proceedings. Your physical survival and shelter always take priority over credit scores.
Next Step: Look at your current bank balance and expected cash flow for the next 30 days. Match your situation directly to Tier 1, 2, or 3 so you know how deep your cuts need to be.
Calculating Your “Survival Number”: The Step-by-Step Audit
Your “Survival Number” is the exact, unvarnished dollar figure required to keep your household alive and legally compliant for 30 days. To build it accurately, you cannot rely on rough estimates; you must calculate your actual net cash needs from the ground up, as detailed in our guide on how to start budgeting.
Step 1: Secure the “Core Four”
Every dollar you have must first defend what personal finance experts call the Core Four:
- Shelter: Your rent or mortgage payment (including property taxes and escrow). If you rent, this keeps you housed. If you own, keeping the primary lien current avoids foreclosure.
- Basic Utilities: Electric, water, gas/heating, and basic trash pickup. You cannot live in an apartment without water or in a cold climate without heat. In today’s economy, a basic home internet plan also belongs here if your income or job search depends entirely on remote connectivity.
- Caloric Staples (Basic Groceries): Nutritious, home-cooked food. This does not mean ribeye steaks, pre-washed organic berry packs, or premade deli meals. It means bulk oats, eggs, rice, beans, frozen vegetables, peanut butter, and ground poultry. Zero restaurant meals, zero takeout, and zero alcohol.
- Essential Transportation: Minimum fuel to get to work or job interviews, basic auto insurance to remain street-legal, and critical public transit fares. If you have a car payment, evaluate whether defaulting puts you at immediate risk of repossession.
Step 2: Account for Medical and Legal Non-Negotiables
Next come health and legal necessities that cannot be deferred without immediate severe consequences:
- Prescription Medications: Daily life-sustaining medications (insulin, blood pressure treatments, inhalers) must never be skipped to save cash.
- Health Insurance Premiums: If you are between jobs, evaluate catastrophic coverage through the healthcare.gov ACA Marketplace or evaluate COBRA carefully.
- Court-Ordered Obligations: Child support and alimony payments must remain paid in full. Falling behind on these carries severe legal penalties, wage garnishments, and potential jail time that will destroy any recovery effort.
Step 3: The 48-Hour Subscription & Discretionary Purge
Now comes the surgical strike. Comb through your last 60 days of checking account and credit card statements. Cancel, pause, or suspend every luxury and recurring micro-transaction:
- Streaming video and music platforms (Netflix, Hulu, Spotify, Disney+)
- Gym and fitness studio memberships (switch to outdoor runs and bodyweight workouts)
- Subscription boxes (clothing, beauty, gaming, meal kits)
- Cloud storage upgrades, premium mobile apps, and digital gaming passes
- Delivery convenience packages (Amazon Prime, Walmart+, DoorDash DashPass, Uber One)
💡 Pro-Tip: The “Card Lock” Subscription Freeze:
If tracking down dozens of hidden subscriptions feels overwhelming, call your bank and report your debit card lost or use an online virtual card service to lock charges. When recurring charges hit the dead card number, vendors will email you that the charge failed. You can then deliberately choose to ignore the notice or formally close the account without combing through individual settings menus.
Step 4: The Downgrade Strategy (Keep the Utility, Slash the Price)
Survival budgeting does not mean eliminating every service; it often means aggressively downgrading existing contracts:
- Cell Phone Service: If you are paying $85 to $110 per month on a postpaid contract with Verizon or AT&T, switch immediately to a Mobile Virtual Network Operator (MVNO) such as Mint Mobile, Visible, or Cricket Wireless. You can get unlimited talk, text, and 5GB to 15GB of 5G data on the exact same cell towers for $15 to $25 per month. That single 15-minute phone call puts $60 to $85 back in your pocket every month.
- Home Internet: Call your ISP and drop down to their base tier (e.g., 100–300 Mbps). That speed is more than enough for video calls and job hunting, saving $30 to $50 monthly.
- Auto Insurance: Contact your insurance broker. Increase your comprehensive and collision deductibles from $500 to $1,000 or $1,500 (provided you have enough cash buffer to cover the deductible), or update your policy if your annual mileage dropped significantly after a job transition.
Next Step: Open your banking app right now. Add up your Core Four expenses, required medications, and downgraded essential services. That final sum is your official Monthly Survival Number.
Baseline Budget vs. Bare Bones Budget: A Real-World Comparison
To see how transformative this process is, let’s examine a typical American household bringing home $5,200 in net monthly pay. Notice how shifting from a standard lifestyle baseline to an emergency survival framework immediately frees up substantial cash flow without touching housing costs.
By shifting to a bare bones budget, this household preserved $1,740 per month in cold, hard cash without moving homes or giving up their car. That reclaimed cash flow can stretch an emergency fund three times further or quickly crush a high-interest credit card balance.
Next Step: Compare your actual monthly expenses against the rows above. Circle the top three categories where you can slash spending immediately this week.
Financial Triage: What to Pay When You Cannot Pay Everything
What happens when your income completely disappears, or your savings run so dry that even your bare bones survival number is higher than the money in your checking account? This is where panic sets in for many families. People make the critical mistake of paying whichever collector yells loudest over the telephone, often draining their last $500 on a credit card bill while their rent check bounces.
When you cannot pay all your bills, you must implement a strict Hierarchy of Financial Triage:
- Food and Essential Medications: If you are malnourished or sick, you cannot work, interview, or care for your children. Fueling your body is Priority #1.
- Roof and Heat: Pay the landlord or mortgage company. Pay the gas and electric companies. Keeping your family sheltered and warm prevents eviction and disruption.
- Primary Vehicle: If you live in an area without reliable public transportation and need your car to earn an income or search for employment, pay the auto loan and auto insurance. Repossession happens fast—often after 60 to 90 days of non-payment.
- Secured Loans and Essential Tools: Any debt tied to equipment or tools required to perform your job.
- Unsecured Consumer Debt: Credit cards, department store cards, medical debt, and personal signature loans fall here. If you are forced to choose between groceries and paying Chase or Capital One, buy the groceries every single time.
Proactive Hardship Communications
Creditors and service providers are far more accommodating when you contact them before your bill is past due. Financial institutions maintain dedicated hardship departments with policies designed to prevent defaults. Use these exact scripts when calling your providers:
Script 1: Negotiating with Your Utility Provider
“Hello, my account number is [Account #]. I am currently experiencing an unexpected financial hardship due to a recent [job loss / medical emergency]. I want to keep my account current, but I cannot afford my full balance this month. What budget billing plans, deferred payment arrangements, or low-income assistance programs do you offer to prevent any service interruption?”
Script 2: Contacting Your Landlord or Property Manager
“Hi [Landlord’s Name], I wanted to reach out proactively before the 1st of the month. I have had a temporary disruption in my household income. I value living here and have always paid on time. I can pay 50% of the rent on the 1st, and I would like to establish a written payment schedule to cover the remaining balance across two installments later this month. Can we put this arrangement in place?”
Script 3: Requesting a Credit Card Hardship Program
“Hello, I am calling about my credit card ending in [Last 4 Digits]. Due to a recent financial shock, I am temporarily unable to make my standard minimum payment. I want to honor my obligations, but I need assistance. Does your bank offer an internal Hardship Program that can temporarily lower my interest rate, waive late fees, or pause my minimum payments for the next 60 to 90 days?”
Next Step: If you anticipate missing an upcoming payment, set aside 30 minutes tomorrow morning. Call your service providers using the scripts above before your due date arrives.
Calculating Your Emergency Cash Runway
When an income disruption hits, your primary metric of financial safety is not your net worth—it is your runway. Your runway measures exactly how many months your household can survive without any incoming salary before your cash reserves hit zero.
The mathematical formula is simple:
Financial Runway (Months) = Total Liquid Cash (Checking + HYSA) ÷ Bare Bones Monthly Survival Number
Consider the power of compressing your spending down to bare bones during an emergency:
- Scenario A (Standard Spending): You have $9,000 saved in a High-Yield Savings Account. Your normal monthly lifestyle costs $4,500. Your runway is:
$9,000 ÷ $4,500 = 2.0 months. You have only 60 days to find a job before panic sets in. - Scenario B (Bare Bones Budget): You immediately strip away all discretionary spending and lower your survival number to $2,700 per month. Your runway is now:
$9,000 ÷ $2,700 = 3.33 months. You have just bought yourself an extra six weeks of breathing room.
🎉 The Psychological Relief of Extended Runway:
Desperation leads to bad decisions. When you have only two weeks of cash left, you might accept a terrible, underpaid job or take out a high-interest payday loan. By dropping into a bare bones budget on Day One, you extend your runway, maintain leverage during job interviews, and protect your long-term earning potential.
Next Step: Log into your bank accounts, add up your total liquid cash, and divide it by your Monthly Survival Number to find your exact runway in months.
Psychological Survival: Overcoming Frugal Fatigue and Isolation
Operating on a bare bones budget is simple on paper, but psychologically taxing in practice. Denying yourself small pleasures—a takeout meal after a hard day, an impulse purchase, or drinks with friends—triggers “frugal fatigue” if maintained for too long. If you don’t manage the psychological strain, you risk binging financially and blowing through your savings.
To keep your discipline sharp and avoid burnout, master the operational principles of sticking to a budget even in difficult conditions:
1. Build a “Zero-Dollar Dopamine” Menu
Deprivation without an emotional outlet causes stress. Sit down with your family or partner and assemble a list of enjoyable activities that cost zero dollars:
- Checking out graphic novels, new releases, and audiobooks through the public library (using apps like Libby and Hoopla).
- Hosting a “pantry-cleanout” potluck dinner where friends bring ingredients from their own kitchens to cook together.
- Exploring local state parks, hiking trails, or free museum admission days.
- Scheduling game nights or movie marathons using the free streaming services offered through your local library system (like Kanopy).
2. Establish 30-Day Checkpoints
Never treat a bare bones budget as an indefinite sentence. Set your calendar for a formal review every 30 days. At each checkpoint, ask yourself:
- Has the underlying income crisis resolved or improved?
- Are our utility and grocery numbers accurate, or did we underestimate baseline needs?
- Can we safely reintroduce one low-cost convenience (like a $12 streaming service or a weekly $15 family pizza night) to relieve pressure?
Next Step: Pick one free activity from your local library or community calendar and schedule it for this weekend so you don’t feel completely disconnected from entertainment.
The Exit Strategy: Transitioning Back to Normal Spending
A survival budget is an emergency response vehicle, not a permanent vehicle. Once you secure a new job, resolve your medical emergency, or crush the high-interest credit card debt that prompted your sprint, it is time to transition out.
However, you must avoid the “post-diet rebound.” People who suddenly jump from an ultra-strict survival budget back into unmonitored spending often end up right back in debt. Instead, use a controlled, three-phase re-entry:
Phase 1: Solidify Your Fully Funded Emergency Cushion
Before you start dining out or buying new clothes, direct your new surplus income toward expanding your emergency fund. Build a full 3 to 6 months’ worth of essential expenses in a dedicated High-Yield Savings Account. This ensures that the next unexpected life event will be an inconvenience, not a catastrophe.
Phase 2: Gradual Reintroduction of Discretionary Wants
Reintroduce non-essentials systematically. In Month One of recovery, re-subscribe to your favorite entertainment platform or restore your gym membership. In Month Two, add a modest dining-out allocation. Observe how your cash flow responds before committing to higher fixed obligations.
Phase 3: Graduate to a Sustainable Long-Term Framework
Do not go back to unmonitored finances. Transition your habits into a balanced, long-term framework such as the 50/30/20 Rule or Zero-Based Budgeting. To discover which permanent system matches your personality and financial goals, read our comprehensive field review where we tested every popular budgeting method for 90 days to find out what actually works.
Next Step: Write down your exact “off-ramp criteria”—the specific savings balance or new income level that signals it is safe to loosen your budget and return to normal spending.
📌 The 24-Hour Bare Bones Action Checklist
- Audit the Core Four: Total up your absolute minimum expenses for shelter, basic utilities, staple groceries, and necessary transit.
- Purge Subscriptions: Cancel or pause every unused streaming app, gym membership, and retail delivery package.
- Downgrade Tech: Switch postpaid mobile phone plans to an MVNO to instantly save $50 to $100 per month.
- Triage Debts: Protect your shelter and food first; contact creditors proactively using hardship scripts before missing a due date.
- Calculate Your Runway: Divide your liquid cash reserves by your monthly survival number to know exactly where you stand.
- Protect Your Morale: Set up a free activity list and mark a 30-day review date on your calendar to avoid frugal burnout.
Tackling Impulse Spending
You clock out after a grueling ten-hour shift, sink into the couch, unlock your phone, and open a social media feed to decompress. Twenty minutes later, an algorithm-fueled video pitches a $45 pocket gadget or a set of organizer bins you did not know existed half an hour ago. You double-click the side button on your phone, Apple Pay processes the transaction in less than two seconds, and the order is confirmed before your rational brain has even caught up. Or maybe your spending trigger hits in the aisles of Home Depot, Target, or the grocery store: you walked in to grab a $4 box of drywall anchors or a carton of eggs, and you walked out with $130 worth of clearance power tool accessories, seasonal snacks, and work shirts.
If this pattern feels familiar, let’s get one thing straight right away: impulse spending is not a moral failing, a lack of willpower, or proof that you are bad with money. It is the predictable outcome of a consumer environment engineered by retail conglomerates and tech platforms that spend billions of dollars designing frictionless checkout flows. Their single business goal is to eliminate every second of hesitation between your emotional impulses and your checking account balance.
Taking back control of your finances does not mean putting yourself on a joyless financial crash diet, eating plain ramen for every meal, or cutting out every convenience in your life. Real, lasting financial peace comes from environmental engineering—putting strategic friction, practical speed bumps, and intentional boundaries between the sudden urge to buy and the physical act of handing over your hard-earned paycheck.
1. The Neurochemistry of the Swipe: Why Your Brain Loves Impulse Buying
To break an expensive habit, you have to understand the biological machinery driving it. When you spot an enticing product on a store endcap or across a social feed, your brain does not wait for you to bring the item home and use it before giving you a neurochemical reward. Dopamine surges during the anticipation of the purchase.
The neurochemical high lives entirely in the fantasy: imagining how that new socket set will organize your garage, how that jacket will make you look on a weekend night out, or how that kitchen gadget will magically fix your dinner routine. The moment the purchase is finalized and the payment clears, your dopamine levels drop sharply, frequently replaced by a wave of buyer’s remorse.
The Disappearance of the “Pain of Paying”
For generations, everyday commerce had built-in biological protection. When you went to a local hardware or department store, you pulled physical paper bills from your wallet, counted out five twenty-dollar bills, handed them to a cashier, and watched your cash physically disappear. Behavioral research conducted at institutions like MIT and Carnegie Mellon University proves that parting with physical cash activates the insula—the region of the brain associated with physical pain and disgust. Spending cash literally hurts.
Over the last decade, financial technology companies and online retailers have systematically eliminated every trace of that friction:
-
1-Click Checkout: Retail giants store your shipping address and payment credentials, letting you complete an expensive purchase in less time than it takes to draw a breath.
-
Digital Wallets: Contactless taps via Apple Pay and Google Pay detach the physical sensation of parting with money from the transaction itself.
-
Buy Now, Pay Later (BNPL) Services: Services like Klarna, Affirm, and Afterpay split a $200 splurge into four deceptively small payments of $50, disguising the true hit to your monthly cash flow. Data from the Consumer Financial Protection Bureau (CFPB) shows that BNPL users are significantly more likely to overextend themselves across multiple accounts simultaneously.
-
Algorithmic Micro-Targeting: Social platforms monitor your viewing time, your late-night browsing habits, and your search queries to serve hyper-targeted ads precisely when your mental defenses are depleted.
Your Actionable Next Step: Identify which digital payment method makes spending easiest for you (Apple Pay, stored Amazon card, or PayPal) and commit to adding at least one layer of manual confirmation to it this week.
2. The 4 Emotional Triggers Behind Every Unplanned Purchase
Nobody pulls out their debit or credit card intending to sabotage their financial goals. Impulse spending is an emotional reaction disguised as a practical decision. To stop the leak, you must first identify the underlying feeling driving you toward the checkout counter.
1. The HALT Framework (Physical & Emotional Depletion)
Adapted from behavioral health and addiction recovery methods, the HALT framework demonstrates that human decision-making deteriorates when you are experiencing one of four physiological or emotional states:
-
Hungry: Stopping by a grocery store or gas station on an empty stomach after a long shift easily inflates your receipt by 25% with impulse junk snacks, drinks, and processed food.
-
Angry: A frustrating argument with a boss, dispatcher, or family member leaves you searching for a fast hit of personal autonomy or comfort.
-
Lonely: Late-night phone browsing, comment sections, and livestream shopping channels offer a synthetic sense of connection and belonging.
-
Tired: After a 10- or 12-hour workday, your prefrontal cortex—the part of the brain handling self-regulation and long-term planning—is exhausted. You order $40 of takeout delivery because boiling water and washing a pan feels insurmountable.
2. “Revenge Spending” & Exhaustion Entitlement
When you spend your entire week busting your tail at a physically demanding or mentally stressful job, your brain starts looking for compensation: “I work hard all week, I break my back, I deserve this $80 purchase.”
This is known as exhaustion entitlement. While you certainly deserve comfort and relaxation, using retail spending as a band-aid for workplace burnout creates a vicious cycle: spending money you cannot afford forces you to take on more overtime shifts just to pay off the balance.
3. The “Deal Illusion” (The Discount Fallacy)
Retail stores and e-commerce apps engineer artificial urgency using countdown timers, clearance stickers, and “Buy 2 Get 1 Free” promotions. Your brain sees a 40% discount and frames it as a financial win. But remember the cardinal rule of frugality: An item marked down from $100 to $60 does not save you $40 if you never planned to buy it; it costs you $60.
4. Fantasy Self Shopping
We frequently buy goods for an imaginary, idealized version of ourselves. We purchase $120 worth of specialized camping gear for outdoor trips we don’t take, high-end kitchen appliances for elaborate meals we don’t have time to cook, or expensive fitness setups for workouts we haven’t started. The purchase serves as a mental substitute for doing the actual work.
Actionable Next Step: The next time you feel a strong urge to make an unplanned purchase, pause for 30 seconds and check your physical state against HALT. If you are hungry, angry, lonely, or exhausted, address that physical need first. Print out our Emotional Spending Journal to record exactly how buying (or not) makes you feel over time.
3. The Reality Audit: Mapping Your Personal Spending Leaks
You cannot fix a financial leak you refuse to look at. Most consumers underestimate their monthly discretionary spending by $300 to $600 because they only tally major fixed bills like rent, auto loans, utilities, and insurance. They overlook the daily $7 convenience store energy drinks, the $20 hardware clearance runs, and the steady trickle of online micro-orders.
For the next 14 days, perform an objective spending audit. Approach this with zero self-judgment. You are not grading yourself; you are simply gathering raw data to see where your money actually goes.
When you complete the weekly reflection at the bottom of your tracker, take ten minutes to answer these questions honestly:
-
How many impulse buys did I make this week?
-
What were my most common triggers?
-
Was there a situation I handled better than usual?
-
Did I notice any positive changes?
-
What will I try next week to improve?
When you analyze your audit data, you will notice that impulse purchases do not happen randomly. They concentrate during specific transition windows: the drive home from work, late-night phone scrolling in bed, or walking through retail aisles without a written shopping list.
Actionable Next Step: Print the Impulse Spending Tracker and place it next to your keys or computer desk to record any non-essential purchase you make over the next 14 days.
4. Environmental Engineering: Adding Friction Back to Your Money
Willpower is an exhaustible battery that drains steadily throughout the day. If your plan to stop impulse spending relies entirely on resisting temptation through raw mental discipline, you will eventually cave when fatigue sets in. The sustainable solution is environmental engineering: adjusting your daily routine so that spending impulsively requires noticeable time and physical effort.
1. Delete Stored Cards and Turn Off Autofill
Log into your primary online retail accounts (Amazon, Walmart, Target, eBay, Home Depot) and delete your saved credit and debit card information. Next, open your browser settings in Chrome, Safari, or Edge and disable the Autofill Payment Methods feature.
When you want to buy something online, force yourself to get off the sofa, walk into another room, grab your wallet, pull out your card, and manually enter 16 numbers, the expiration date, and the CVV code. That sixty seconds of manual friction breaks the automatic dopamine loop and gives your logical brain time to evaluate the purchase.
2. The 72-Hour Rule & The Wish List System
Implement an unbreakable household rule: any unplanned, non-essential purchase over a specific dollar threshold (e.g., $30 or $50) requires a mandatory 72-hour cooling-off period.
-
When you see something you want to buy, add it to a designated “Wish List” note on your phone.
-
Walk out of the store or close the browser tab immediately.
-
Leave the item untouched on your list for three full days.
-
If you still genuinely want and need the item after 72 hours—and your budget has the cash available to cover it without relying on credit cards—you can buy it guilt-free.
You will find that roughly 80% of the items you add to your wish list lose their appeal within two or three days. The emotional urgency simply evaporates.
3. Calculate the Price in “Hours of Life Energy”
Price tags use dollar figures because fiat currency feels abstract. You can cut through that abstraction by translating the retail price into the exact number of hours you must work to pay for it.
4. Conduct a Digital Marketing Detox
Every commercial email in your inbox and promotional text message on your phone is a targeted invitation to spend money you had no intention of parting with. Take twenty minutes to remove these daily triggers:
-
Search your email inbox for the word “Unsubscribe” and opt out of every retail mailing list, daily deal newsletter, and seasonal brand promotion.
-
Reply “STOP” to all retail SMS marketing alerts. The Federal Trade Commission (FTC) enforces strict compliance rules requiring companies to remove you promptly upon request.
-
Delete retail apps (Amazon, Temu, Shein, eBay) directly off your smartphone. If you legitimately need to buy something essential, make yourself log in through a web browser on a desktop computer.
-
Unfollow social media influencers and deal-hunting accounts whose content revolves around shopping hauls and product recommendations.
5. Use Physical Cash for High-Risk Categories
If you routinely overspend on convenience runs, dining out, or weekend entertainment, take plastic payment methods out of the equation entirely. Withdraw your designated weekly discretionary allowance in cash on payday. When the bills in your envelope are gone, spending in that category is finished until your next paycheck. For a complete breakdown of how to structure cash categories, check out our guide on popular budgeting methods and cash envelope systems.
Actionable Next Step: Open your smartphone right now, delete at least one shopping application from your home screen, and unsubscribe from three retail marketing emails.
5. In-the-Moment Triage: The “Do I Really Need This?” Decision Tree
When you are standing in a store aisle holding an item or staring at an online checkout button, you need a straightforward mental flowchart to cut through emotional rationalizations. Walk through this logical decision path before every purchase:
Actionable Next Step: Save a screenshot of the Do I Really Need This? Decision Tree on your smartphone so you can pull it up whenever you feel tempted in a store checkout line.
6. Zero-Cost Dopamine Swaps: Replacing the Habit Loop
Attempting to stop impulse spending through pure deprivation creates resentment. The human brain naturally resists restrictions that feel like punishment. To successfully eliminate a destructive habit, you must keep the cue and the reward, but replace the routine with a zero-cost alternative.
When you feel the sudden urge to browse or spend to blow off steam, swap in one of these practical alternatives:
When an intense impulse hits, use the 10-Minute Delay Rule. Tell yourself: “I am allowed to buy this, but first I must drink a large glass of ice water and do 10 push-ups, or sweep the garage floor for 10 minutes.” In almost every case, changing your physical state breaks the mental loop, and the urge disappears.
Actionable Next Step: Choose one zero-cost activity from the list above and set it as your default substitute the next time you feel bored or restless after work.
7. How to Structure Your Budget for Guilt-Free Permission
One of the primary reasons people experience severe impulse spending relapses is that their monthly budget is too restrictive. If your spending plan directs every single dollar toward bills, debt payoff, and savings—leaving exactly $0.00 for personal enjoyment—you will inevitably break your rules.
A sustainable budget must give you explicit permission to spend money on things you love without remorse.
1. Allocate a Non-Negotiable “Fun Money” Allowance
As detailed in our foundational guide on how to start a budget that actually sticks, every workable household plan must include a dedicated discretionary line item. Whether that amount is $25 per week or $150 per month depending on your take-home pay, this money is yours to spend on whatever you want—zero tracking, zero judgment, and zero guilt.
When you have a dedicated pool of cash for small daily pleasures, you remove the deprivation mindset that triggers massive spending binges.
2. Automate Sinking Funds for Major Planned Wants
Many so-called “impulse” purchases are actually predictable expenses that caught you without dedicated savings. You know your work boots will wear out, your vehicle will need brake pads, holidays happen every December, and birthdays occur on the exact same date every year.
Set up automated sinking funds inside a dedicated High-Yield Savings Account (HYSA) at an FDIC-insured or NCUA-insured institution. Setting aside $30 or $50 every paycheck into sub-accounts for vehicle maintenance, seasonal gifts, clothing, and electronics turns what would have been stressful impulse swipes into calm, cash-funded transactions.
3. Recovering Quickly After a Spending Slip-Up
Building long-term financial discipline is not an all-or-nothing proposition. If you lose focus and make an unplanned impulse purchase, do not throw in the towel and blow the rest of your month’s budget. Accept the mistake, record it in your tracker, adjust your discretionary spending for the remaining weeks to balance the difference, and keep moving forward. For strategies on maintaining consistency when unexpected disruptions happen, read our practical guide on how to stick to a budget in the real world.
Actionable Next Step: Review your monthly budget and create a dedicated line item for personal fun money, even if it is just $10 a week to start.
8. The 30-Day Impulse Spending Challenge
The most reliable way to build permanent financial habits is by stacking small, manageable wins every single day. You do not need to overhaul your entire life overnight; you just need to follow a structured roadmap.
Follow this 30-day progression to completely reset your baseline habits:
Actionable Next Step: Print out the 30-Day Impulse Spending Challenge Grid and start with Day 1 today.
You do not need to fight retail marketing algorithms and psychological triggers empty-handed. We have assembled all four of our printable worksheets, tracking logs, and visual guides into a complete, easy-to-use toolkit.
Take Your First Small Step Today
Stopping impulse spending is not about achieving perfection or eliminating every small joy in life. It starts with one small, deliberate speed bump: deleting a single shopping app from your phone, letting an online cart sit untouched for 72 hours, or pausing to calculate how many physical hours of labor a price tag represents. Pick one strategy from this guide, apply it today, and watch your bank account and your financial confidence begin to grow.
Editorial Disclaimer: TalkBudget provides general educational content and is not a registered financial advisor or CPA. Please consult a qualified professional before making major financial decisions.
Sticking to a Budget
Sticking to a budget is rarely a willpower problem; it is almost always an engineering problem. Most Americans do not abandon their financial plans because they lack discipline or ambition. They abandon them because traditional budgeting advice demands robotic perfection in an unpredictable world. When an unexpected car repair hits, or a long week leads to takeout dinners, a rigid plan shatters, leading to guilt, budget fatigue, and total abandonment.
According to data from the Federal Reserve, more than a third of American adults would struggle to cover an unexpected $400 emergency expense with cash. When every extra dollar is tightly cordoned off without room to breathe, even a minor surprise blows the entire monthly plan apart. Real-world financial success is not about white-knuckling your way through extreme deprivation—it is about designing resilient systems that make staying on a budget the path of least resistance.
◈ Key Takeaway: The Three Laws of Budget Adherence
- Automate the non-negotiables: Separate fixed bills and savings from daily variable cash using independent accounts.
- Build structural shock absorbers: Include an unallocated monthly buffer ($100–$200) and dedicated sinking funds so surprises do not derail your core plan.
- Inject tactical friction: Neutralize instant online checkout and retail marketing triggers before willpower gets tested.
If you have already laid your foundation using our step-by-step walkthrough on how to start budgeting, this guide provides the missing operational blueprint. Below, we break down the behavioral psychology of overspending, examine tactical friction methods, establish bulletproof banking firewalls, and walk through a 15-minute weekly routine designed to keep your money on track permanently.
1. The Psychology of Overspending (Why Your Brain Fights Your Budget)
To master spending management, you must first understand that modern retail environments are intentionally engineered by behavioral scientists to bypass your rational prefrontal cortex. Understanding the psychological reasons for overspending removes personal shame and allows you to build targeted defenses.
The Dopamine Seeking Loop & Digital Friction Removal
Anticipation drives human behavior. When you browse an online store or view a limited-time flash sale, your brain releases dopamine—the neurotransmitter responsible for motivation and reward-seeking. Crucially, dopamine spikes during the hunt and the anticipation of buying, not after the purchase is completed. Once the package arrives on your doorstep, the neurochemical surge fades, often replaced by buyer’s remorse.
E-commerce platforms amplify this loop by systematically eliminating payment friction. Features like one-click checkout, saved credit card autofill in browsers, Apple Pay, and Buy Now, Pay Later (BNPL) installment loans separate the pleasure of acquiring an item from the immediate pain of parting with cash. When friction drops to zero, impulse spending climbs.
The “What-the-Hell” Effect (Counterregulatory Behavior)
In behavioral economics, counterregulatory spending describes what happens when a small slip turns into a total collapse. If you budget $150 for a weekly grocery run but end up spending $172, a perfectionist mindset triggers an internal reaction: “Well, I’ve already blown the budget for this week, so what the hell—I might as well order delivery tonight and buy those shoes I was looking at.”
Keeping to a budget requires treating spending limits like highway guardrails, not razor-thin balance beams. Bumping into a guardrail means you make a minor steering adjustment; it does not mean you drive off the bridge.
Decision Fatigue and the Depletion of Willpower
Willpower is a finite cognitive resource that depletes over the course of a day. Every decision you make at work, every email you answer, and every traffic jam you navigate drains your mental battery. If your financial plan relies entirely on saying “no” through sheer willpower at 8:00 PM on a Friday after an exhausting 50-hour workweek, the plan will fail. Staying on a budget requires shifting the burden away from daily active willpower and onto passive, automated systems.
🔷 Behavioral Concept: The Pain of Paying
Studies pioneered by researchers at MIT and Carnegie Mellon show that paying with physical cash activates the insula—the brain region linked to physical discomfort and pain. Swiping a credit card or tapping a phone significantly dampens this insular response. To curb spending, you must deliberately re-insert artificial friction into digital payment channels.
2. Tactical Friction: How to Stop Overspending Before It Starts
If you regularly ask yourself, “how do I stop overspending when temptation is everywhere?”, the answer lies in environmental design. You do not change your fundamental desires overnight; you change your immediate spending environment to make impulsive decisions difficult and deliberate decisions easy.
The Digital Purge: De-Linking Frictionless Payment Rails
Take 20 minutes today to execute a digital declutter across your devices:
- Remove Saved Cards from Browsers: Clear stored credit and debit card numbers from Google Chrome, Safari, and Autofill settings. Forcing yourself to physically stand up, find your wallet, and manually type in a 16-digit card number gives your logical brain time to intervene.
- Unlink 1-Click Ordering: Turn off instant purchasing options inside online marketplace apps like Amazon, eBay, and Target.
- Disable Fast Mobile Wallets for Non-Essentials: If food delivery or ride-sharing apps trigger overspending, disconnect Apple Pay, Google Wallet, or PayPal from those accounts.
- Unsubscribe from Retail Newsletters: Marketing emails claiming a “48-Hour 40% Off Flash Sale” manufacture artificial urgency for items you did not need ten minutes earlier. Use an email filter to bulk-unsubscribe or route commercial promotions into a separate folder you only open during planned shopping trips.
The 72-Hour Rule & The “Hours of Labor” Translation
For any non-essential purchase exceeding $50, implement a mandatory 72-hour cooling-off window. When you feel the urge to buy, bookmark the item or add it to a “Saved for Later” wish list. Step away completely. More than half of all impulse desires dissolve once the initial dopamine spike subsides over three days.
If you still want the item after 72 hours, translate its price tag into real hours of your life rather than abstract dollars. Divide the retail price by your true hourly net wage (what you earn per hour after federal, state, and FICA payroll deductions):
◈ Example: Calculating True Labor Cost
Assume your net take-home pay is $3,200 per month across 160 working hours ($20.00/hour net).
You want a new designer jacket priced at $180.
Calculation: $180 / $20 = 9 full hours of work.
Ask yourself: Is this jacket worth spending from 8:30 AM to 5:30 PM on a Monday working solely to pay for it?
Targeted Friction Protocols by Spending Category
Different spending triggers require different interventions. Use the table below to deploy specific counter-measures based on where your money tends to leak:
3. Structural Fixes: Engineering a Failure-Proof Financial Firewall
One of the primary reasons people fail at stay on budget efforts is co-mingling funds. When your rent money, utility bills, emergency savings, and weekend entertainment allowance all sit inside a single checking account, you are forced to do complex mental math every time you glance at your account balance.
The Dual-Checking “Firewall” Architecture
To eliminate mental math and prevent accidental overspending on fixed obligations, separate your cash flow physically across two separate checking accounts at your bank or credit union:
- Account #1: Fixed Bills & Obligations Checking: This account handles all non-negotiable living costs—mortgage/rent, utilities, auto insurance, minimum debt payments, child care, and internet. Direct deposit routes the exact amount needed for monthly fixed bills directly here. You never carry the debit card for this account in your wallet.
- Account #2: Variable Lifestyle & Daily Spending Checking: This account receives your discretionary allowance for groceries, dining out, gas, clothing, and entertainment. When you open your banking app to see what you can spend on Saturday night, the balance you see is 100% safe to spend. If the balance reaches $0, discretionary spending stops until the next pay cycle—without endangering your rent.
🟣 Pro-Tip: The Automated Payday Split
Most employer payroll portals allow you to split your direct deposit into multiple destination accounts. Route your fixed bill total into Account #1, your target savings percentage directly into an FDIC-insured High-Yield Savings Account (HYSA), and the remaining variable balance into Account #2. Your budget executes itself automatically before you ever log in.
Sinking Funds: Neutralizing “Surprise” Irregular Bills
Irregular expenses are not genuine emergencies. Your car will eventually need new tires. Your annual Amazon Prime membership will renew. Your dog will need vaccinations. The holidays arrive every December 25th like clockwork.
When you treat predictable, irregular costs as sudden emergencies, they destroy your confidence and force you onto credit cards. The solution is the systematic use of sinking funds. A sinking fund is simply a savings sub-category where you save a small amount each month for a specific future expense.
To calculate a sinking fund allocation, divide the expected total bill by the number of months until it is due:
The $150 “Oops” Line Item (Zero-Guilt Cushion)
Human beings cannot forecast 30 days of expenses with penny-perfect precision. A sudden school fee arises, gas prices spike 20 cents per gallon, or you run out of laundry detergent and olive oil in the same week.
Instead of assuming zero margin for error, build an intentional $100 to $200 “Oops Buffer” into every monthly spending plan. If minor miscellaneous expenses arise, they absorb into this cushion without impacting your core categories. If you reach the final day of the month with the buffer untouched, you can sweep that balance directly into savings or apply it toward debt reduction.
4. Choosing Your System: App, Planner, or Spreadsheet?
A tracking system must fit your psychological preference, not someone else’s aesthetic. If an author tells you that you must use a complex spreadsheet, but opening Excel gives you anxiety, you will abandon it within two weeks. If you are debating which strategy fits your personality, check our comparison where we tested every popular budgeting method for 90 days.
Here is how to select the right platform to manage personal finance day-to-day:
5. The 15-Minute Sunday Money Date (Weekly Maintenance Routine)
Budgets do not break in monthly increments; they break in weekly increments. Waiting until the 31st of the month to review your transactions is an autopsy; reviewing them weekly is active steering.
Set a recurring calendar event every Sunday morning for a 15-minute “Money Date.” Grab a cup of coffee and complete this four-step checklist:
- Step 1: Reconcile Pending and Cleared Transactions (4 Minutes)
Log into your financial tool or spreadsheet and match all transactions from the past 7 days. Ensure no unrecognized subscriptions, duplicate merchant charges, or fraudulent transactions slipped through. - Step 2: Balance the Buckets via the “Rule of Reallocation” (4 Minutes)
Did you overspend on dining out by $35 this week? Do not panic, and do not abandon the budget. Simply reallocate $35 from an underspent category (like clothing or your “Oops Buffer”) to balance the ledger back to zero. A budget is a living, breathing allocation roadmap, not stone tablets. - Step 3: Preview the Upcoming 7-Day Social Calendar (5 Minutes)
Look at your work and personal calendar for the week ahead. Is there a birthday party on Thursday? A work lunch on Tuesday? An oil change scheduled for Friday? Adjust your spending allocations today so that these planned events do not surprise you midweek. - Step 4: Identify and Celebrate One Weekly Win (2 Minutes)
Did you cook four meals at home? Did you negotiate $15 off your internet bill? Did you avoid an impulse purchase during a flash sale? Acknowledging positive progress releases dopamine, reinforcing the healthy habit loop for the coming week.
◈ Sunday Money Date Quick Reference Card
◻ Log & Categorize: Confirm all 7-day card transactions.
◻ Rebalance: Cover category deficits from surplus categories.
◻ Calendar Forecast: Check the next 7 days for birthdays, travel, or bills.
◻ Micro-Win: Note one positive financial choice made this week.
6. Living on a Budget with a Partner or Family
Living on a budget as an individual is straightforward; doing so with a spouse, partner, or family introduces competing priorities, different money mindsets, and emotional complexity. According to relationship surveys, money disagreements remain a leading cause of marital stress.
The “Yours, Mine, and Ours” Hybrid System
Total financial fusion can cause tension over minor purchases, while complete financial separation often hinders progress toward large joint goals like buying a home or funding retirement. The most sustainable architecture for couples is the hybrid account system:
- The Joint Account (“Ours”): Both partners contribute an agreed-upon dollar amount or percentage of their income into a shared account. This fund covers the mortgage/rent, utilities, groceries, joint savings goals, and child expenses.
- Individual Fun Accounts (“Yours” & “Mine”): Each partner receives an equal monthly personal allowance transferred into their own separate checking accounts. This money is 100% discretionary with zero oversight required.
🟢 Relationship Rule: The “No-Questions-Asked” Allowance
Establish a strict monthly dollar amount (e.g., $100–$250 each) that each partner can spend entirely on whatever they want—video games, cosmetics, golf outings, or vintage collectibles—without needing permission, justification, or guilt. Autonomy preserves harmony.
The “Large Purchase Notification” Threshold
Agree together on a mutual threshold for joint expenditures (e.g., any non-essential purchase over $150 requires a brief 2-minute conversation before buying). This simple boundary eliminates unexpected credit card statement shocks while preserving everyday operational trust.
7. The Emergency Recovery Protocol (What to Do When You Blow Your Budget)
Every experienced budgeter eventually blows a category. You travel for a wedding, get hit with high surge-pricing on rideshares, buy multiple rounds of drinks, and suddenly find yourself $300 in the red.
Novice budgeters respond with shame and give up entirely. Experienced financial managers execute a damage control protocol:
🔴 Beware: The “Starvation Rebound” Trap
Never attempt to “punish” yourself for overspending by cutting your grocery or living budget down to zero for the following two weeks. Financial starvation diets lead to severe willpower depletion, almost guaranteeing another massive spending binge shortly after.
The 3-Step Recalibration Playbook
- Step 1: Execute a 48-Hour Discretionary Freeze
Stop the bleeding immediately. Commit to spending $0 on non-essential categories for exactly 48 hours. This pauses emotional momentum and clears the cognitive fog of a financial slip. - Step 2: Conduct a Blameless Trigger Audit
Ask yourself objective questions: Was the overspending caused by an unrealistic original estimate? An unexpected social pressure? An emotional reaction to work stress? Identify the true root cause without self-blame so you can engineer a structural guardrail around it next time. - Step 3: Spread the Adjustment Across Multiple Buckets
If you are over by $200, do not eliminate one entire category. Trim $40 from dining out, $30 from entertainment, $30 from personal shopping, and pull $100 from your monthly “Oops Buffer” or emergency fund. Distributing the adjustment keeps every category functional.
Consistency Beats Perfection
A successful financial life is not built on a single month of flawless discipline. It is built across years of continuous, flexible adjustments. Sticking to a budget is like navigating a ship: crosswinds and waves will push you off course every single week. Your job is not to prevent the wind from blowing; your job is simply to check your compass, adjust your rudder during your Sunday Money Date, and keep sailing forward.
Editorial Disclaimer: TalkBudget provides general educational content and is not a registered financial advisor or CPA. Financial situations vary widely based on individual circumstances, local tax regulations, and evolving market conditions. Please consult a qualified professional before making major financial decisions.
How To Start Budgeting
Budgeting is not a financial crash diet. It is not about depriving yourself of every latte, canceling dinner with friends, or living in an empty apartment eating plain ramen. When done correctly, a budget is simply an intentional spending plan that gives you guilt-free permission to spend money on what actually matters to you while quietly building your wealth in the background.
If you have ever reached the end of the month and wondered where your hard-earned paycheck vanished, you are not alone. Over 60% of Americans live paycheck to paycheck, including a significant percentage of six-figure earners. The problem is rarely a lack of income; it is the absence of a clear, automated allocation system. Without a plan, money leaks out through subscription creep, impulse shopping, and surprise expenses.
This comprehensive, step-by-step guide will walk you through building your very first workable budget from scratch. We will audit your real cash flow, match you with the right budgeting framework, tame unpredictable expenses, and automate your finances so your money starts working for you—not the other way around.
📌 The 5 Golden Rules of Budgeting That Actually Works
1. Base your numbers on net pay (what actually hits your checking account, not your gross salary).
2. Cover the “Core Four” first (shelter, utilities, basic groceries, and essential transportation).
3. Build a $1,000 starter buffer in a High-Yield Savings Account (HYSA) before making aggressive financial moves.
4. Plan for irregular bills using monthly “sinking funds” so annual expenses never feel like emergencies.
5. Give yourself guilt-free fun money to keep your budget sustainable over the long haul.
Phase 1: The 60-Day Financial Reality Audit
Before you can decide where your money should go, you need an honest, judgment-free snapshot of where it is currently going. Most beginners make the mistake of creating an aspirational budget based on how they wish they spent money. That approach almost always falls apart by day fourteen. Instead, we start with hard data.
Step 1.1: Calculate Your Real Net Take-Home Pay
Your gross salary looks impressive on an offer letter, but you cannot pay your rent with money you never received. Your starting budget number must always be your net take-home pay—the exact dollar amount deposited into your checking account after all deductions.
These payroll deductions typically include:
- Federal, State, and Local Income Taxes: Mandatory withholdings determined by your W-4 form.
- FICA Taxes: Mandatory 6.2% Social Security and 1.45% Medicare contributions.
- Pre-Tax Benefits: Employer-sponsored health, dental, and vision insurance premiums.
- Pre-Tax Retirement Contributions: Traditional 401(k) or 403(b) contributions, as well as Health Savings Account (HSA) or Flexible Spending Account (FSA) allocations.
Also, pay close attention to your pay frequency schedule:
- Bi-Weekly (Every 2 Weeks): You receive 26 paychecks per year. That means 10 months have two paychecks, and two “magic” months have three paychecks. Build your base monthly budget around two paychecks, treating the third paycheck as an instant bonus for savings or debt payoff.
- Semi-Monthly (Twice a Month): You receive 24 paychecks per year, typically on the 1st and 15th (or 15th and last business day). Your monthly income remains identical every month.
- Weekly (Every Week): You receive 52 paychecks per year. Multiply your average weekly paycheck by 4.33 to calculate your baseline monthly cash flow.
⚠️ Beware: The “Gross Income Trap”
If you earn a $60,000 annual salary, your monthly gross pay is $5,000. However, after taxes, insurance, and a modest 5% 401(k) contribution, your actual monthly deposit might only be $3,650. Writing a budget based on $5,000 creates an immediate $1,350 phantom deficit that guarantees failure before you even start.
Step 1.2: The 60-Day Transaction Lookback
Log into your online bank and credit card accounts and download your statements for the last 60 days. Open a clean spreadsheet or grab a notebook and categorize every single transaction into one of two buckets:
- Fixed Expenses: Bills that remain virtually identical every billing cycle (rent/mortgage, auto insurance, internet, car payment, student loan minimums, gym membership).
- Variable Expenses: Costs that fluctuate depending on your choices and lifestyle (groceries, restaurant meals, gas, rideshares, clothing, personal care, entertainment).
Step 1.3: Uncover “Phantom Spending” and Subscription Creep
As you review your statements, highlight recurring micro-transactions. It is easy to ignore a $9.99 streaming app, a $4.99 cloud storage upgrade, or an annual $119 subscription renewal, but together they quietly drain hundreds of dollars per month. List every active subscription, cancel the ones you have not used in the last 30 days, and total up what is left. This forms your real baseline spending.
Phase 2: Choose Your Budgeting Framework
There is no single “correct” way to budget. The best budgeting system is the one you can stick with consistently for six months without wanting to tear your hair out. Here are the four proven budgeting frameworks used by personal finance experts:
1. The 50/30/20 Rule (The Balanced Baseline)
Created by Senator Elizabeth Warren, this method divides your net take-home pay into three broad percentages.
- 50% for Needs: Essential living expenses (housing, utilities, groceries, transportation, minimum debt payments, health insurance).
- 30% for Wants: Discretionary lifestyle spending (dining out, streaming services, concerts, travel, hobbies).
- 20% for Savings & Extra Debt Payoff: Building an emergency fund in an HYSA, investing for retirement (Roth IRA), and paying down high-interest credit card debt.
Best for: Beginners, busy professionals, and anyone who wants financial structure without tracking every coffee purchase.
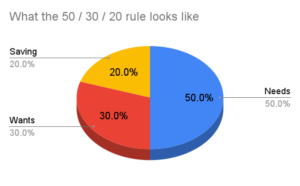
What 20/30/50 budget looks like as a pie
Read more: The 50/30/20 Budget: A Beginner’s Guide to Stress-Free Money Management
2. Zero-Based Budgeting (The Precision Plan)
Popularized by financial author Dave Ramsey and software like YNAB (You Need A Budget), Zero-Based Budgeting assigns every single dollar a specific job until your income minus your planned allocations equals exactly zero: Income - Expenses - Savings = $0.
If your monthly take-home pay is $4,000, all $4,000 is distributed across fixed bills, variable categories, sinking funds, debt payoff, and savings. Not a single dollar is left floating aimlessly in your checking account.
Best for: Aggressive debt elimination, analytical personalities, and anyone who feels their money constantly slips through their fingers.
Read More: Zero Based Budgeting
3. Pay-Yourself-First / Reverse Budgeting (The Minimalist Route)
Instead of categorizing every line item, you immediately divert your target savings and investment amount out of your paycheck the day you get paid (e.g., sending $600 to an HYSA and a Roth IRA). Once your fixed bills and savings are covered, you are completely free to spend whatever balance remains in your checking account on whatever you want, guilt-free.
Best for: People who hate tracking daily receipts and simply want to ensure their future is funded without micro-managing line items.
Read more: Pay Yourself First
4. The Envelope System / Digital Cash-Stuffing
This classic method involves setting strict cash spending limits for high-risk categories like groceries, dining out, and entertainment. You withdraw physical cash on payday and place it into labeled envelopes. Once an envelope is empty, spending in that category stops completely until the next month. Modern digital equivalents use separate checking sub-accounts or debit cards with balance alerts.
Best for: Chronic overspenders, people breaking a credit card dependence, and hands-on tactile learners.
Read More: Envelope Budgeting in the Cashless Age
💡 Free Tool: Download Our Starter Budgeting Spreadsheet Pack
Not sure where to start? Grab our free TalkBudget Starter Spreadsheet Pack. It includes automated templates for both the 50/30/20 Rule and Zero-Based Budgeting in Google Sheets and Microsoft Excel format. Simply plug in your income and the formulas handle the math automatically. Find it at the end of the article!
Phase 3: Step-by-Step Construction of Your First Monthly Budget
Now it is time to build your actual numbers. Whether you are using a spreadsheet, an app, or a notebook, follow this sequential hierarchy to assemble your spending plan:
Step 3.1: Secure the “Core Four” Non-Negotiables First
If you lose your job or experience an unexpected financial emergency, your money must protect four essential pillars before anything else:
- Shelter: Rent or mortgage payment, HOA fees, and property taxes. Aim to keep housing costs under 28–30% of your net take-home pay whenever possible.
- Utilities: Electricity, natural gas, heating oil, water, sewer, and a basic mobile phone/internet plan.
- Basic Food: Nutritious, home-prepared groceries. Exclude fancy restaurant meals, daily work lunches, and high-end delivery services from this baseline.
- Essential Transportation: Basic auto loan payment, gasoline, public transit pass, auto insurance, and basic maintenance required to commute to work.
Step 3.2: Build Your $1,000 “Shock Absorber” Cushion
Before putting every spare penny toward aggressive debt payoff or long-term investments, establish an initial $1,000 Starter Emergency Fund. Keep this cash parked in a dedicated, FDIC-insured High-Yield Savings Account (HYSA) separate from your day-to-day checking account.
Why? Because life happens. A blown car tire, a plumbing leak, or an unexpected urgent care co-pay will easily derail a budget if you have no cash reserves, forcing you right back onto high-interest credit cards. This $1,000 buffer turns a financial crisis into a minor inconvenience.
Step 3.3: Master “Sinking Funds” for Irregular Expenses
The number-one reason budgets fail after 60 days is unexpected, non-monthly expenses: semiannual car insurance premiums, annual Amazon Prime renewals, holiday gift shopping, veterinarian checkups, and routine dental cleanings. These are not true emergencies—they are predictable, irregular expenses.
The solution is a sinking fund. Divide the total annual cost by 12 and save that amount every single month:
- Car Insurance ($1,200/year): Save
$100/monthinto your HYSA sinking fund. - Holiday Gifts ($600/year): Save
$50/monthstarting in January. - Home & Car Maintenance ($1,200/year): Save
$100/monthfor routine tune-ups and repairs.
When the bill arrives in October or December, the money is already sitting in your savings account waiting to be spent.
Step 3.4: Protect Your Guilt-Free “Fun Money”
A budget that allows zero fun is doomed from day one. Humans are not spreadsheets; if you build a plan with 0% allocated for recreation, you will eventually burn out and go on an impulsive spending binge. Earmark a dedicated 5% to 10% of your net pay for pure discretionary fun—video games, nice dinners, concert tickets, craft coffee—with zero guilt attached.
Phase 4: Overcoming Real-World Budgeting Roadblocks
A budget on paper is easy; keeping it on track in the real world is where the challenge lies. Here is how to navigate the three most common roadblocks that derail beginner budgets:
Roadblock 1: Budgeting on an Irregular or 1099 Freelance Income
If you are a gig worker, freelancer, real estate agent, or commission-based sales rep, your monthly income fluctuates constantly. Creating a standard static budget based on your best earning month will quickly lead to cash shortfalls during slower periods.
Use the “Holding Tank” Baseline Strategy:
- Determine Your Bare-Bones Baseline: Calculate the minimum monthly cost required to cover your Core Four and minimum debt payments.
- Budget Off Your Worst Month: Look back at your lowest-earning month over the past year. Use that lower figure as your standard monthly spending cap.
- Establish a Tax & Income Buffer Account: Open a dedicated secondary checking or savings account. All client payments land here first. Pay your living expenses like a fixed salary from this account into your personal checking. In fat months, leave the surplus in the holding tank to cushion the lean months.
ℹ️ The 1099 Tax Reserve Rule
If you receive 1099 independent contractor income, no taxes are withheld from your gross checks. Automatically transfer 25% to 30% of every single client payment into a separate savings account reserved exclusively for estimated quarterly IRS and state tax payments. Never include this tax reserve in your spendable household budget.
Roadblock 2: What to Do When Expenses Exceed Income
When you complete your audit, you might discover that your expenses are larger than your paycheck. If your math reveals a monthly deficit, activate the Budget Triage Protocol:
- Level 1 (Immediate Pauses): Temporarily pause all extra debt principal payments and non-essential savings until cash flow is positive. Pay only the minimum balances due on credit cards and personal loans to protect your FICO score.
- Level 2 (Discretionary Slash): Eliminate dining out, cancel unused streaming apps and gym memberships, and meal-plan strictly around grocery store sales.
- Level 3 (Fixed Cost Renegotiation): Call your auto insurance provider to shop your rate or raise your deductible. Call your internet provider to negotiate promotional pricing or drop unnecessary speed tiers. Shop around for lower-cost mobile carriers (like MVNOs).
- Level 4 (Income Acceleration): If structural expenses (like high rent) cannot be immediately cut, bridge the gap with short-term overtime, freelance gig work, or selling unused household items while planning a longer-term career or housing pivot.
Roadblock 3: The Mid-Month Overspend
What happens when you budget $300 for groceries but end up spending $410 by the 20th of the month? Do not abandon your entire budget! Budgeting is a dynamic, living system, not a rigid test of perfection.
Follow the “Roll With the Punches” Principle: When you overspend in one category, balance the ledger by reducing another category. Take $60 from your dining out line and $50 from your clothing or entertainment line to cover the grocery overage. As long as your total monthly outflow remains within your total net take-home pay, your budget is successful.
Phase 5: Automation, Tooling, and Your 15-Minute Maintenance Routine
Manual budgeting fails when it becomes exhausting. The secret to sustaining a budget for years is setting up automated systems that handle the heavy lifting while you live your life.
Step 5.1: Build Your Payday Automation Pipeline
Set up automatic transfers through your employer’s direct deposit or via your bank’s recurring transfer settings to route your income the morning your paycheck arrives:
- 70% remains in your primary Checking Account for bills, groceries, and daily living.
- 15% auto-transfers to your High-Yield Savings Account (HYSA) for emergency funds and sinking funds.
- 10% auto-transfers to your Roth IRA / Brokerage Account for long-term compound growth.
- 5% auto-transfers to a Secondary Discretionary Checking Account for your guilt-free spending debit card.
✅ The Power of Payday Automation
By automating your savings and bill allocations the exact morning your paycheck lands, you remove willpower from the equation. You will naturally adapt your spending to whatever balance remains in your primary checking account without feeling restricted.
Step 5.2: The 15-Minute “Weekly Money Date”
You do not need to log transactions every day. Set a recurring 15-minute calendar invite every Sunday evening or Monday morning to complete this quick checklist:
- Review Account Balances: Check your primary checking and HYSA balances to ensure all expected deposits cleared.
- Reconcile Recent Transactions: Categorize any unassigned expenses in your spreadsheet or budgeting app.
- Check High-Risk Categories: Look at your grocery and entertainment balances for the remaining days in the month.
- Preview Upcoming Calendar Events: Scan your calendar for the upcoming week (birthdays, work trips, dinners out) and make minor category adjustments proactively.
Read More: Sticking to a Budget
Phase 6: Your 7-Day Budgeting Action Plan
Building a solid financial foundation does not require a full weekend of stress. Take it one simple step at a time over the next seven days:
Join TalkBudget & Get Your Free Pack
Get our free 50/30/20 & Zero-Based templates instantly, plus practical money tips in your inbox.
By subscribing, you agree to receive email updates from TalkBudget. Read our Privacy Policy. Esily unsubscribe anytime in 1 click.
Editorial Disclaimer: TalkBudget provides general educational content and is not a registered financial advisor or CPA. Please consult a qualified professional before making major financial decisions.
I Tried Every Popular Budgeting Method for 90 Days. Here Is What Stuck
For years, my relationship with money was a cycle of anxiety and avoidance. I knew I needed a budget, but every time I tried to start one, I felt overwhelmed by spreadsheets, guilt over past purchases, and the sheer restrictiveness of it all. I’d download an app, use it for a week, and then abandon it the moment I overspent on takeout. Sound familiar? I realized that the problem wasn’t necessarily my lack of discipline, but rather that I hadn’t found a system that actually fit my brain and my lifestyle. So, I decided to conduct an experiment. I committed to trying the most popular budgeting methods over a 90-day period. My goal wasn’t to become a financial guru overnight, but simply to find a system that I could stick with—one that made me feel in control rather than constrained. This is the honest account of my 90-day budgeting bootcamp, the methods I tested, the spectacular failures, and ultimately, the hybrid approach that finally stuck.
Month 1: The 50/30/20 Rule – The Broad Strokes Approach
I started with the 50/30/20 rule because it seemed the least intimidating. The premise is simple: divide your after-tax income into three buckets. 50% goes to “Needs” (rent, groceries, utilities), 30% goes to “Wants” (dining out, entertainment, hobbies), and 20% goes to “Savings and Debt Repayment.”
The Experience
Setting it up was a breeze. I calculated my monthly take-home pay, did the math, and set up automatic transfers for the 20% savings portion right on payday. For the first two weeks, I felt like a financial genius. The 30% “Wants” category felt generous, and I didn’t feel the need to track every single coffee purchase, as long as I stayed within that broad percentage.
However, the cracks started to show around week three. The biggest issue was defining what constituted a “Need” versus a “Want.” Is a gym membership a need for my physical health, or a want because I could technically run outside for free? Is high-speed internet a need because I work from home occasionally, or a want because I could survive on a slower tier?
Furthermore, living in a high-cost-of-living area meant my rent and basic utilities easily consumed more than 50% of my income. Trying to squeeze my “Needs” into that rigid half felt impossible and immediately set me up for failure. I found myself constantly adjusting the percentages to fit my reality, which defeated the purpose of the rule.
The Verdict on 50/30/20
- Pros: Incredibly easy to understand and set up. Great for beginners who need a general framework. Automating the 20% savings is a powerful habit builder.
- Cons: Too rigid for high-cost living areas. The line between needs and wants is often blurry, leading to justification of unnecessary spending. It lacks the granular tracking needed to identify specific problem areas.
Month 2: Zero-Based Budgeting – Every Dollar Has a Job
Determined to get more granular, I moved on to Zero-Based Budgeting (ZBB) for month two. The philosophy here is that your income minus your expenses should equal exactly zero. Every single dollar you earn is assigned a specific “job” before the month begins—whether that job is paying rent, buying groceries, or going into a savings account.
The Experience
This method required a significant mindset shift. Instead of looking at my bank balance and thinking, “I have $500 left,” I had to look at my budget categories. I spent hours at the end of the previous month meticulously planning where every dollar of my upcoming paychecks would go.
The first week was a revelation. I felt an unprecedented level of control. Because I had already allocated money for dining out, I could enjoy a meal without the usual guilt. However, the administrative burden was heavy. I had to track every single transaction manually to ensure my categories balanced.
The real challenge came when unexpected expenses arose—a surprise medical bill and a necessary car repair. Because every dollar was already assigned, I had to “steal” from other categories to cover these costs. This constant reshuffling felt like a failure, even though it’s a normal part of ZBB. It required a level of daily engagement that I found exhausting. If I missed tracking expenses for a few days, reconciling the budget became a monumental chore.
The Verdict on Zero-Based Budgeting
- Pros: Provides maximum control and visibility over your money. Eliminates “accidental” spending because every dollar is accounted for. Great for aggressive debt payoff or saving goals.
- Cons: Highly time-consuming and administratively heavy. Can feel restrictive and stressful when unexpected expenses occur. Requires constant daily or weekly maintenance.
Month 3: The Envelope System (Cash Stuffing) – The Tangible Reality
For the final month, I decided to go old-school with the Envelope System, recently popularized on social media as “cash stuffing.” The idea is to take your discretionary spending categories (groceries, entertainment, gas), withdraw that amount in cash, and put it into physical envelopes. When the envelope is empty, you stop spending in that category.
The Experience
I was skeptical about carrying cash, but the psychological impact was immediate and profound. Handing over physical bills for a coffee felt significantly different than tapping a piece of plastic. It made the transaction real.
I created envelopes for Groceries, Dining Out, Fun Money, and Miscellaneous. The first time I went to the grocery store, I found myself carefully calculating the cost of items in my cart to ensure I didn’t exceed the cash in my envelope. It forced me to prioritize and make conscious choices.
However, the practicalities of a cash-only system in a digital world were frustrating. Many places I frequent are cashless or prefer cards. Splitting bills with friends became a logistical nightmare of Venmo requests and cash exchanges. Furthermore, I missed out on the credit card rewards I usually earn on these purchases. The biggest drawback, though, was the lack of a digital trail. If I lost a receipt, I had no idea where the cash from the “Miscellaneous” envelope went.
The Verdict on the Envelope System
- Pros: Incredible psychological impact; makes spending feel “real.” Physically prevents overspending in specific categories. Great for curbing impulse purchases.
- Cons: Inconvenient in a digital/cashless society. Loss of credit card rewards. Difficult to track spending if receipts are lost. Security concerns with carrying large amounts of cash.
The Aftermath: What Actually Stuck
After 90 days of financial whiplash, I sat down to evaluate the experiment. I realized that no single method was perfect for me. The 50/30/20 rule was too vague, Zero-Based Budgeting was too demanding, and the Envelope System was too impractical.
However, I had learned valuable lessons from each. I needed the automation of the 50/30/20 rule, the intentionality of Zero-Based Budgeting, and the psychological friction of the Envelope System.
My Hybrid System: “Automated Intentionality”
Here is the system I developed that has actually stuck with me long after the 90-day experiment ended:
- Pay Yourself First (The 50/30/20 Lesson): On payday, a set percentage of my income is automatically transferred to my savings and investment accounts. I don’t even see this money in my checking account. This ensures my future is funded before my present is spent.
- Fixed Expenses on Autopilot: All my fixed, non-negotiable bills (rent, utilities, insurance, subscriptions) are set to autopay from a dedicated checking account. I calculate the total monthly cost of these and ensure that amount remains untouched.
- The “Digital Envelope” for Discretionary Spending (The ZBB & Envelope Lesson): This is where the magic happens. I calculated a realistic weekly allowance for all my variable spending—groceries, dining out, entertainment, and miscellaneous. I transfer this exact amount every Monday into a separate checking account linked to a specific debit card.
- The Rule: I can spend the money on that specific debit card however I want during the week. If I blow it all on fancy dinners by Wednesday, I’m eating rice and beans until the next Monday. When the balance hits zero, the spending stops.
Why This Works for Me
This hybrid approach minimizes the administrative burden while maximizing control. I don’t have to track every single transaction or categorize every coffee. I only have to monitor the balance of my “Digital Envelope” account. It provides the psychological friction of a limited resource (like cash envelopes) without the inconvenience of physical money. It also allows for flexibility; if I want to spend my entire weekly allowance on a concert ticket and eat leftovers all week, I can, without feeling like I “broke” my budget.
Table: Comparison of Budgeting Methods Tested
|
Method |
Core Philosophy |
Best For |
Biggest Drawback |
My Key Takeaway |
|
50/30/20 Rule |
Broad percentage buckets (Needs/Wants/Savings) |
Beginners, those who hate detailed tracking |
Too rigid for high COL areas, blurry lines between needs/wants |
Automating savings is non-negotiable. |
|
Zero-Based Budgeting |
Every dollar is assigned a specific job |
Detail-oriented people, aggressive debt payoff |
High administrative burden, stressful when unexpected expenses occur |
Intentionality is powerful, but micromanagement is exhausting. |
|
Envelope System |
Cash only for discretionary spending |
Chronic overspenders, visual learners |
Impractical in a digital world, loss of credit card rewards |
Physical (or digital) limits curb impulse spending. |
|
My Hybrid System |
Automate fixed costs/savings, weekly allowance for the rest |
Those seeking balance between control and convenience |
Requires discipline to not transfer extra funds to the allowance account |
Budgeting must fit your lifestyle, not the other way around. |
Conclusion
The most profound realization from my 90-day experiment is that a budget is not a moral document; it’s simply a tool. If a tool is too heavy, too complicated, or doesn’t fit your hand, you won’t use it. The failure wasn’t mine for not sticking to Zero-Based Budgeting; the failure was trying to force my life into a system that didn’t suit it.
If you’re struggling to budget, stop trying to be perfect. Experiment with different methods. Take the parts that resonate with you and discard the rest. The “best” budgeting method isn’t the one that financial experts tout; it’s the one you can actually stick with month after month. By combining automation with a simplified weekly allowance, I finally found financial peace of mind, proving that sometimes, the most effective system is the one you build yourself.
I Tried Cash Stuffing for 60 Days. My Honest Results
In an increasingly digital world, where transactions are often invisible swipes and taps, the concept of “cash stuffing” feels like a financial throwback. Yet, this budgeting method, a modern twist on the classic envelope system, has gained significant traction, particularly on social media. The premise is simple: allocate specific amounts of physical cash into designated envelopes for various spending categories, and once an envelope is empty, you stop spending in that area. Proponents rave about its ability to curb impulse spending, foster financial mindfulness, and provide a tangible connection to one’s money. Intrigued by the viral trend and the promise of real financial control, I decided to dive headfirst into cash stuffing for 60 days. This is my honest, no-holds-barred account of the experience, detailing the surprising wins, the frustrating headaches, and the ultimate impact it had on my spending habits and financial perspective.
Day 1: The Setup and Initial Excitement
My journey began with a trip to the bank. I withdrew a significant amount of cash, enough to cover my variable expenses for the next two weeks. My chosen categories were:
- Groceries: My largest variable expense.
- Dining Out/Takeout: A notorious budget buster for me.
- Fun Money: For entertainment, hobbies, and social outings.
- Personal Care: Haircuts, toiletries, and small self-care items.
- Miscellaneous: A small buffer for unexpected small costs.
I meticulously labeled five envelopes and, with a sense of ceremony, stuffed the allocated cash into each. The physical act of seeing and touching the money felt powerful. It was a tangible representation of my budget, a stark contrast to the abstract numbers in my banking app. I felt a surge of excitement and optimism, convinced this hands-on approach would finally tame my spending.
Month 1: The Novelty, The Friction, and The Frustration
The first month was a rollercoaster of financial revelations and practical challenges.
The Wins:
- Unprecedented Mindfulness: This was the biggest and most immediate win. Every time I reached for an envelope, I was forced to pause and consider the purchase. Was it truly necessary? Did I have enough in that category? This friction made me incredibly mindful of my spending in a way that card transactions never did. Impulse buys plummeted.
- Visual Accountability: The envelopes provided instant, undeniable feedback. Seeing the “Dining Out” envelope thin out after just a few meals was a powerful visual cue to cook at home. There was no hiding from my spending; the evidence was right there in my wallet.
- Prioritization: With limited cash in each envelope, I had to prioritize. Did I want that extra coffee, or save the money for a nicer dinner later in the week? This forced me to make conscious choices about where my money went.
- Reduced Financial Anxiety (for some categories): Knowing exactly how much I had for groceries meant I could shop without constantly checking my bank balance. There was a strange sense of peace in having a clear, physical limit.
The Headaches:
- The Cashless Conundrum: This was the most significant and persistent frustration. So many places are now cashless or prefer card payments. I frequently found myself in situations where I had cash in the correct envelope but couldn’t use it. This led to awkward moments, using my debit card and then having to “reconcile” by taking cash out of the envelope and putting it back into my bank account (or another savings envelope). It felt like I was constantly working around the system, rather than with it.
- Splitting Bills with Friends: Social outings became a logistical nightmare. When everyone else was Venmo-ing or splitting a card, trying to pay my exact cash portion was cumbersome and often led to me just using my card and then having to adjust my envelopes later.
- Security Concerns: Carrying a significant amount of cash, especially after a fresh withdrawal, made me feel vulnerable. The fear of losing an envelope or having my wallet stolen was a constant low-level anxiety.
- Lost Rewards: I missed out on credit card rewards (cash back, points) that I typically earn on my everyday spending. Over time, these rewards can add up, and foregoing them felt like a tangible loss.
- Lack of Digital Trail: While the simplicity was a pro, the absence of a digital record was a con for me. I couldn’t easily track what I bought within a category, only how much I spent. This made it difficult to analyze my spending patterns or identify specific areas for improvement.
Month 2: Adaptation, Frustration, and a Glimmer of Hope
By month two, the novelty had worn off, and the practical inconveniences became more pronounced. I started to adapt the system to fit my lifestyle, rather than forcing my lifestyle to fit the system.
The Wins (Continued):
- Deepened Financial Awareness: Even with the frustrations, my overall financial awareness had significantly improved. I was more attuned to my spending triggers and better at distinguishing between needs and wants.
- Creative Problem Solving: I started finding creative ways to make it work. For example, I’d use cash for groceries where it was easy, but for online shopping, I’d use my card and then immediately transfer the equivalent amount from my “Miscellaneous” envelope into my savings.
- Reduced Debt: The strict limits on discretionary spending meant I had more money available to put towards debt repayment, which was a huge motivator.
The Headaches (Continued):
- Burnout: The constant mental accounting and the need to reconcile digital and physical spending was exhausting. I found myself procrastinating on updating my envelopes or making transfers, which led to a backlog and increased stress.
- Rigidity vs. Reality: Life is unpredictable. An unexpected invitation or a sudden need for a specific item meant I either had to say no, or engage in the frustrating process of “borrowing” from another envelope, which felt like cheating.
- The “What If” Scenario: What if I needed more cash than I had on hand for an emergency? While I had an emergency fund, the physical nature of the system made me feel less flexible in a crisis.
My Honest Results: What Stuck and What Didn’t
After 60 days, I can confidently say that cash stuffing is a powerful behavioral tool, but it’s not a perfect, standalone budgeting system for everyone, especially in a modern, digital economy.
What Stuck (The Principles I Adopted):
- Mindful Spending: The habit of pausing before a purchase and asking if it aligns with my budget is now ingrained. I still do this, even with card transactions.
- Visual Limits: I’ve adopted a “digital envelope” system for certain categories. I transfer a set weekly amount to a separate debit card for discretionary spending. When that card is empty, I stop spending in those areas. This gives me the psychological friction without the physical cash inconvenience.
- Prioritization: I’m much better at prioritizing my wants and making intentional choices about where my money goes.
What Didn’t Stick (The Aspects I Abandoned):
- Exclusive Cash Use: I simply couldn’t maintain an all-cash system in my daily life. The inconvenience was too great.
- Strict Envelope Isolation: While I try not to borrow, I allow for more flexibility between my digital “envelopes” if a genuine need arises, rather than feeling like I’ve failed.
- Manual Tracking of Every Transaction: I’ve moved back to a budgeting app that automatically categorizes my card transactions, providing the analytics I missed.
Table: Cash Stuffing – The Good, The Bad, and The Practical
|
Aspect |
The Good (Wins) |
The Bad (Headaches) |
The Practical (My Adaptation) |
|
Mindfulness |
Forces conscious spending, reduces impulse buys |
N/A |
Retained through mental checks and digital limits |
|
Accountability |
Instant visual feedback on remaining funds |
Lack of detailed digital trail for analysis |
Digital “envelopes” with automated tracking |
|
Convenience |
Simple setup, no tech required |
Inconvenient in cashless society, awkward for splitting bills |
Hybrid approach: cash for some, digital for others |
|
Security |
Money is physically controlled |
Risk of loss/theft, carrying large sums |
Primarily digital, minimizing physical cash |
|
Rewards |
N/A |
Misses out on credit card rewards |
Re-earned through strategic card use within budget |
|
Flexibility |
Forces prioritization within categories |
Rigid, difficult for unexpected expenses or variable income |
More fluid digital categories, allows for minor reallocations |
Conclusion
My 60-day experiment with cash stuffing was a profound lesson in personal finance. It wasn’t the magic bullet I initially hoped for, primarily due to the practicalities of living in a digital world. However, it was far from a failure. The core principles of cash stuffing—mindful spending, visual limits, and intentional allocation—are incredibly powerful and have fundamentally reshaped my relationship with money.
What nobody tells you about cash stuffing is the sheer inconvenience it can present in modern life, but also the deep psychological impact it can have. It forces you to confront your spending habits head-on, making every dollar feel real. While I won’t be carrying a wallet full of envelopes anymore, the lessons learned have been invaluable. I’ve integrated the best aspects of cash stuffing into a hybrid digital system that provides both control and convenience. So, if you’re struggling with overspending, I highly recommend trying cash stuffing, even if just for a short period. It might not be your long-term solution, but it will undoubtedly teach you invaluable lessons about your money and your spending behavior.